Showing posts with label vegetarian. Show all posts

Wednesday, November 25, 2020

Pan-Roasted Brussel Sprouts with Maple Syrup and Pecans


Pan Seared Brussel Sprouts with Maple Syrup and Pecans 

Makes 3 to 4 servings 

1 pound brussels sprouts, washed, trimmed and sliced in half

2 tbsp extra light olive oil 

2 tbsp maple syrup

salt and pepper

1/4 cup chopped pecans (plain or candied)


1. Heat a large skillet of medium to high heat. Add the olive oil and the brussel sprouts, making sure that most of the sprouts are cut side down in the pan. Let sear for 7 to 8 minutes until they have caramelized nicely and taken on a golden to dark brown color. Carefully stir in the maple syrup. 

2. Remove from heat and season with salt and pepper. Sprinkle the chopped pecans on top before serving. 

Friday, October 2, 2020

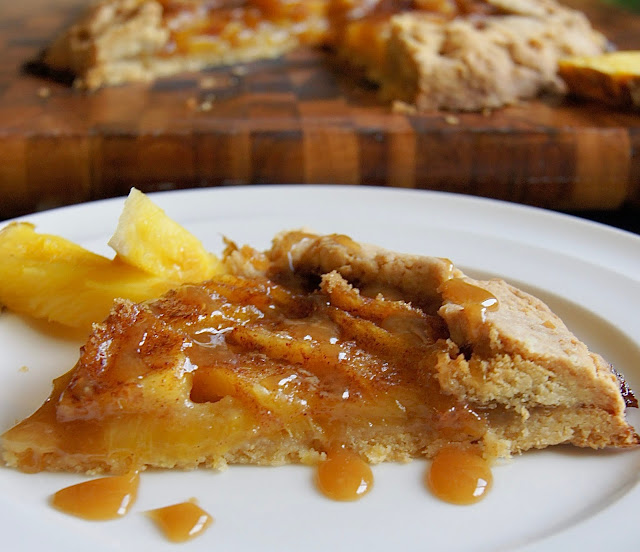
Pineapple Galette


If this were an ordinary year, my family would have been planning a trip to some warm location come fall and winter. But due to the current pandemic, we have been staying close to home and plan to do so for quite a while. So, since we can't be in the tropics, we are channeling tropical vibes and flavors in many of our dishes! 

This pineapple galette is one such dish. Filled with fresh pineapple, sweetened coconut flakes in the crust, and a good pinch of nutmeg, it is reminiscent of the homemade pineapple jam of my childhood in Trinidad - one that, as kids, we would slather unto toast for breakfast. As an added touch, I served it drizzled with a bit of caramel sauce, using this very easy recipe. Also, I am very proud to admit that my 5 year old, who is usually by ym side when I'm baking, offered the most helpful tip with the crust. Instead of trying to lift it unto the baking, simply place the baking sheet at the edge of the counter and gently slid the rolled out crust unto it. Easy squeezy, like he would say. 


Pineapple galette 

For the crust:
1 cup whole wheat pastry flour 
1/2 cup sweetened, shredded coconut 
5 tbsp butter, cut into cubed 
2 to 3 tbsp cold water

For the filling: 
2 cups sliced, fresh pineapple
1/3 cup brown sugar
2 tsp cinnamon 
1/2 tsp grater nutmeg 
2 tbsp cold cutter, cubed

To make the crust:
1. In a food processor, pulse the flour and shredded coconut together until you can no longer see whole shreds of coconut flakes. Add the cubed butter and continue pulsing until the mixture becomes crumbly and takes on the texture of course meal. With the motor running, add two to three tablespoons of ice cold water to the mixture, keeping the motor running just until the mixture begins coming together, not more than 20 to 30 seconds. 
2. Turn the mixture out unto a lightly floured surface, and using your hands bring together to form a ball. wrap with plastic wrap and refrigerate for 30 minutes. 

To assemble the tart:
1. Mix the sugar and spices in a bowl and set aside. 
2. On a lightly floured surface, roll the crust out into a 10 inch circle, about 1/4 inch thick. 
3. Carefully transfer the crust unto a lined baking sheet. (Alternatively, since the crust can be a bit soft and tricky to work with,  tape a sheet of parchment paper (the size of your baking sheet) unto your work surface. and roll out the dough onto the paper. Then, remove and discard the tape, and transfer the parchment paper together with the crust unto your baking sheet.)
3. Arrange the pineapple slices on the tart crust, leaving about a 2 inch border all around. Sprinkle the sugar mixture on top of the pineapple and dot with the cubed butter. Fold the border up over the edge of the pineapple filling, making sure to leave much of the fruit uncovered. Bake in a 375 degree oven for about 50 minutes until the crust is golden brown. Cool on a wire rack for 10 to 15 minutes before serving. 

Saturday, January 19, 2019

Colorful Vegetable Trays - How I Sometimes Get My Toddler To Eat His Veggies


One of the most challenging things I do on a daily basis is try to encourage my toddler to eat vegetables. To give him credit, he does eat those spicy black bean quinoa burgers from Trader Joes (the ones that were voted one of the best veggie burgers on the market). Besides that, the only substantial sources of vegetable nutrition comes from any that I am able to discreetly sneak into foods, such as kale blended into a green smoothie, grated zucchini baked in a chocolate bread,  finely ground peppers and mushrooms incorporated into taco meat, and not forgetting fruit and vegetable pouches - those are heaven sent.

Like most toddlers, mine is attracted to colorful foods. And if he can get involved in its preparation, he will be more prone to  trying it at least once. To that end, I recruit him quite often to " help" me in the kitchen. One of the things he loves to do is spiralize vegetables, in spite  of his deep-seated vegetable aversion. (Of course, we use the spiralizer together and he is never without adult supervision whenever he is in the kitchen.) Much to my surprise, every vegetable that he has spiralized, he has tasted. So far, cucumber has been added to the list of foods he now eats. Carrots? Beets? Still off the list but Rome wasn't built in a day. 

It is a challenge trying to encourage healthy behaviors in toddlers. I think the best we can do is lead by example and continue to have healthy options for food available. I try to have a colorful vegetable platter (ideally one that he and I have prepared together)  on the table most evenings, as often as time, my patience and energy level would allow. Sometimes, my toddler would eat a few pieces - last night he ate two slices of cucumber and a slice of radish. Other times, he runs from the table screaming for three scopes of  ice cream. He likes to keep things interesting, as interesting as I like to keep my vegetable platters.  

Wednesday, February 25, 2015

Spinach, Mushroom & Cheese Strata - a savory bread pudding recipe


When this strata came out of the oven this morning, I knew that it would be the basis of my next blog post.  I like to think of a strata as a savory bread pudding. Unlike the sweet versions, this one is full of wholesome vegetables and, due to the addition of thyme and nutmeg, it makes the kitchen smell a little bit like Thanksgiving. The other good thing about a savory bread pudding is that, even though it lends itself easily to breakfast, it can make a quick weeknight dinner. 


Spinach, Mushroom & Cheese Strata
Serves 4 

2 tbsp vegetable oil
4 sprigs of thyme
8 to 10 mushrooms, cleaned and sliced
10 oz fresh or frozen spinach (if using frozen, make sure to squeeze out as much of the liquid as you can)
6 cups cubed bread
1/4 cup chopped green onions
2 tbsp chopped cilantro
1/2 cup grated cheese
3 eggs
1 cup milk
1/2 tsp salt
1/2 tsp ground pepper
1/4 tsp ground nutmeg

1. Preheat the oven to 350 °F. Grease and set aside an 8"x10" baking dish.
2. Heat a large skillet over medium high heat. Add the thyme and mushrooms. Cook, stirring regularly, until the mushrooms have browned on both sides, about 5 minutes. Remove from the heat and add the spinach. Making use of the residual heat, toss the spinach with the warm mushrooms until it has wilted a bit.
3. In a large mixing bowl, add the bread, green onions, cilantro, cheese and the mushroom mixture.
4. Whisk together the eggs, milk, salt, pepper and nutmeg. Pour over the bread mixture and toss well. Pour the pudding mixture into the prepared baking dish and bake at 350 °F for 40 to 45 minutes, until the top is golden brown. Serve warm.

Friday, August 29, 2014

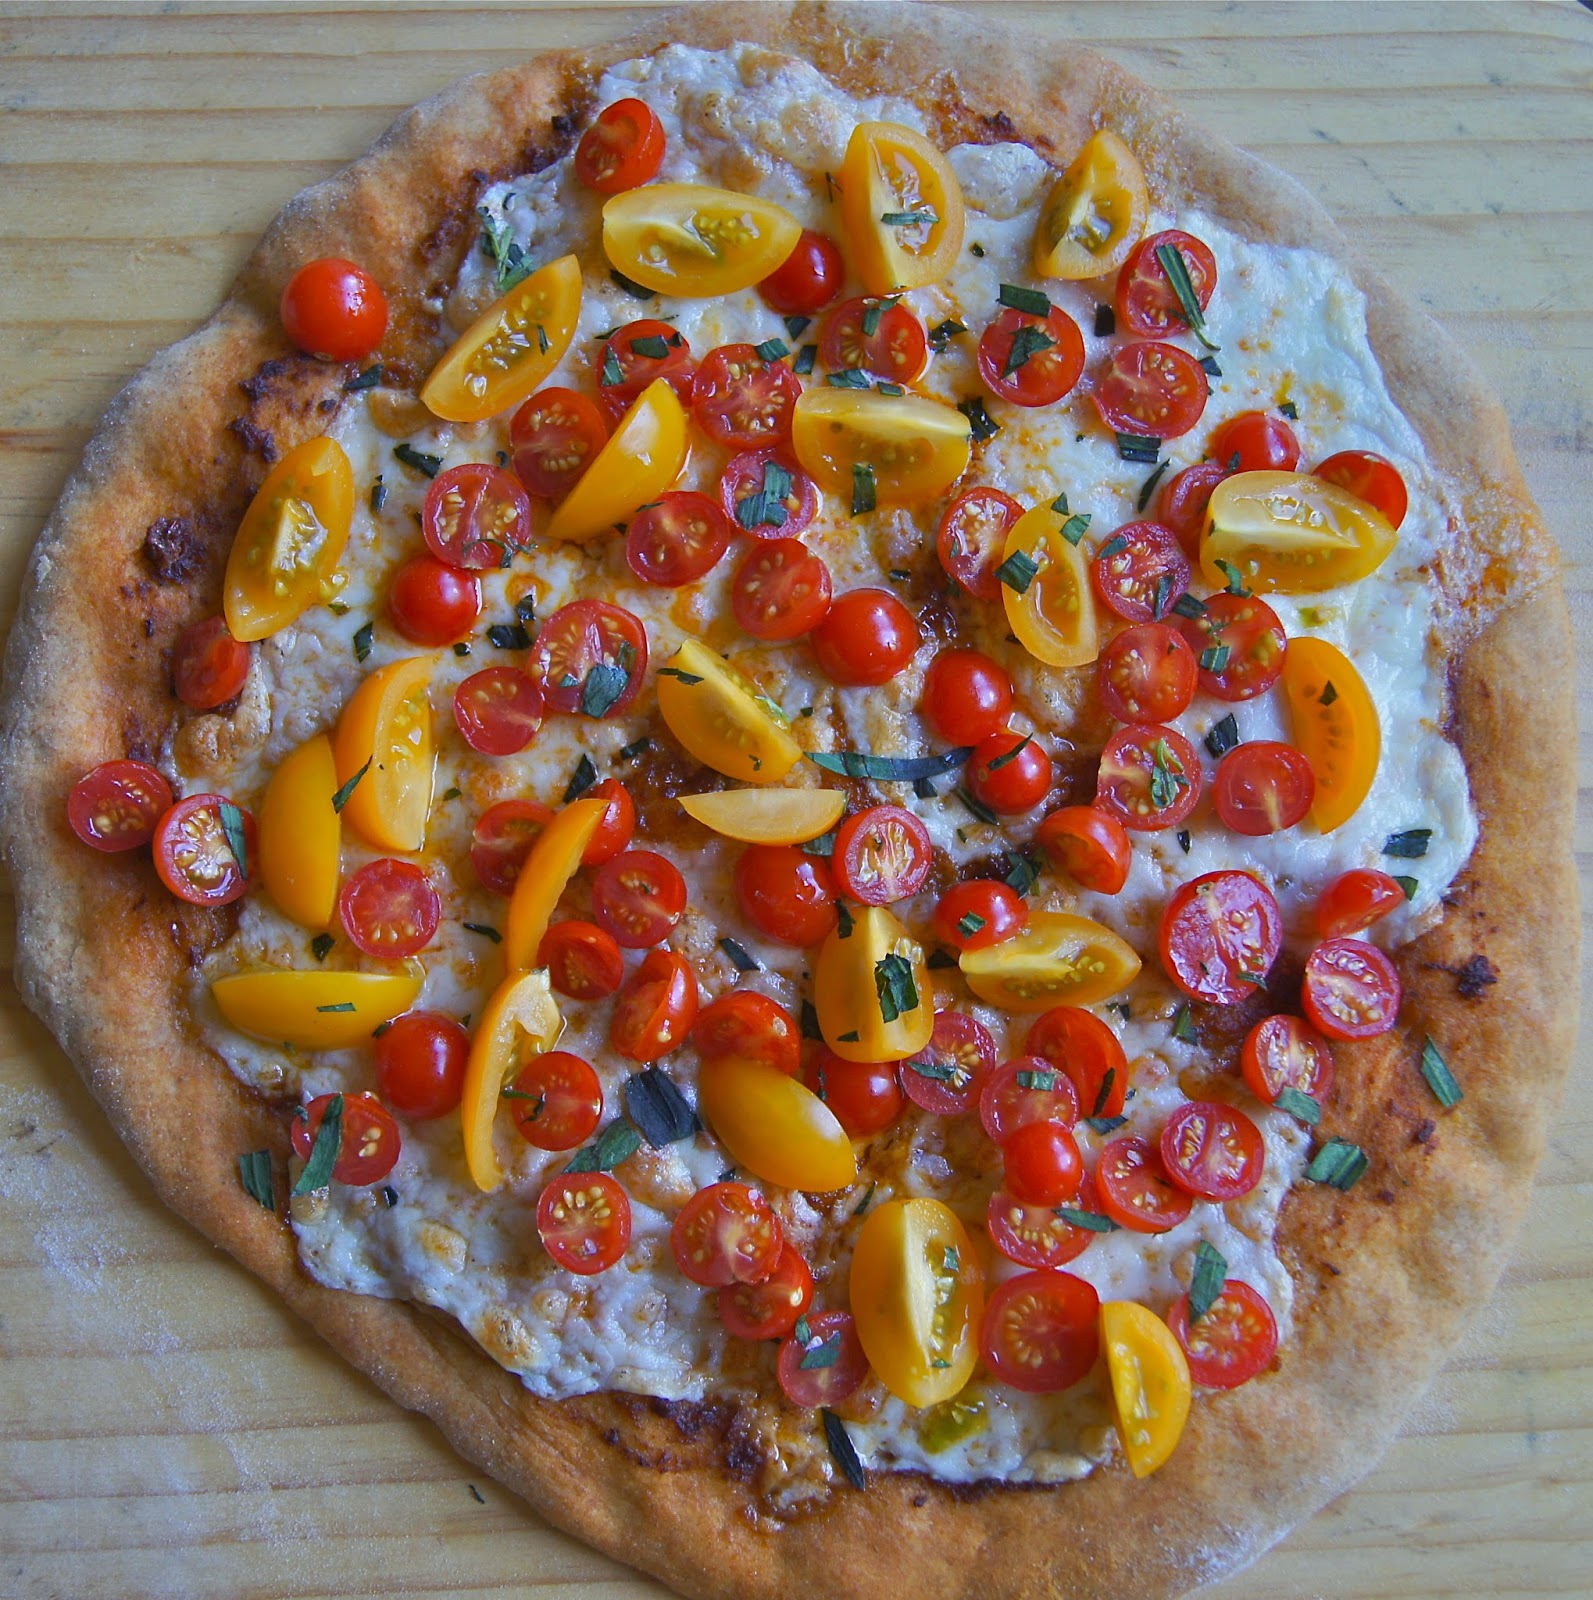
Fresh Tomato Pizza


If you are what you eat, I might soon turn into a giant tomato. Exactly what kind of tomato is a good question. This summer, we experimented with growing tomatoes in pots, on the deck (up high and safe from our resident critters.) Four varieties: roma, beefsteak, cherry, and heirloom. Truth be told, we half-expected that they would not thrive very well given that, firstly, we were growing them in pots and, secondly, that tomato plants are, in general, susceptible to disease. We never expected that we would be reaping vine-ripened tomatoes all summer long.  And by extension, that we would be eating tomatoes all summer long. In cous cous, on bruschetta, in salads, in pasta - these past couple months have been a mini tomato festival at our house. 

As the nights here in Minnesota are getting cooler, the plants are beginning to show signs of the end. They are "thinning", and the leaves are drooping and turning a sort of blue-purple color. But, surprisingly, the cherry tomato plant is still bearing. I managed to pick quite a bit a few days ago, most of which ended up on this pizza. Instead of baking the tomatoes with the other toppings, I decided to put them on after the pizza had baked, in order to savor all of its freshness. For the crust, I used store-bought dough - this can be so convenient on weeknights. And I also added a bit of sun-dried tomato paste to the sauce, which, to me, makes a more flavorful sauce but is by no means necessary. 

Here's to the last few days of summer! 

Fresh Tomato Pizza
Makes one 10" pizza

pizza dough (enough to make one 10" pizza)
1 tbsp olive oil
1/2 cup pizza sauce 
2 tbsp sun-dried tomato paste (optional)
8-10 oz mozzarella, sliced
1/2 lb cherry tomatoes, halved

1. Set the oven to 450 degrees F. 
2. On a clean, floured surface, roll out the dough to about 10" in diameter. Transfer to a greased baking sheet. 
3. Drizzle the olive oil over the pizza dough and, using a pastry brush or the back of a spoon, spread evenly. Next, spread on the pizza sauce. (If using sun-dried tomato paste, stir this into the pizza sauce before spreading it on the pizza dough.) Arrange the mozzarella slices evenly on top. 
4. Bake until the crust is crisp and brown and the mozzarella is bubbly, about 15 minutes. 
5. Right before serving, top the pizza with the fresh cherry tomatoes.

Thursday, October 4, 2012

Butternut Squash and Leek Gratin


When it comes to butternut squash, I tend to rotate the same set of recipes. Most frequently, it's soup. No soup is as creamy, sweet and savory, all at the same time, as a homemade butternut squash soup with a dollop of sour cream, or a swirl of balsamic syrup. Next on the list is butternut squash creme brulee. And finally, butternut squash bread pudding.

This is the first time, however, that I've make butternut squash gratin. A gratin is a simple, baked dish, similar to a casserole, with a golden, browned crust on the top. For this recipe, I've added onions and leeks to the squash base. A final topping of cheese and breadcrumbs, and a short time in the oven, and that's really all there is to it.

This is an easy recipe, the most laborious parts being peeling and cutting the squash, and washing the leeks. For those who haven't cooked with leeks before, you might be wondering what is so difficult about washing leeks. The problem with fresh leeks is that they are grown in sandy soil, which then finds it way into the many tight layers of the vegetable. This is why it is so important that you take the time to carefully wash them before cooking. (I found a quick tutorial of the process on YouTube.)

Having made this dish for the first time, I am confidant that it would become one of my regular butternut squash recipes. I'm even thinking that it would make a lovely side dish for our Thanksgiving dinner this year.


Butternut Squash and Leek Gratin
Serves 4 to 5

1 butternut squash, peeled, seeded and cubed
1 small onion, diced
1 medium leek, washed and chopped
3 tbsp vegetable oil
2 sprigs fresh rosemary
1 tsp salt
1/2 tsp ground black pepper
8 oz mozzarella, sliced or shredded
1 cup seasoned breadcrumbs
1 cup grated cheddar
2 tbsp chopped parsley (optional)

1. Preheat the oven to 300oF. Spray an 8" x 8" baking dish with cooking spray and set aside.
2. In a bamboo or stainless steel steamer, steam the squash until fork tender. I did it in two batches so that the cubes of squash cooked evenly.
3. In a large skillet, heat the vegetable oil over medium heat, and add the onions and rosemary sprigs. Cook until lightly browned on the edges, about 3 minutes. Add the chopped leeks. Continue to cook over medium heat, stirring occasionally to prevent burning. Cook until the leeks are softened, for an additional 4 to 5 minutes. Remove and discard the rosemary sprigs.
4. Combine the squash, onion-leek mixture, salt, and pepper. Transfer to the prepared baking dish. Layer the slices of mozzarella on the top, followed by the breadcrumbs, and finish with the grated cheddar. Baked at 300oF for 25 to 20 minutes, until the top is golden brown. Garnish with chopped parsley and serve warm.

Tuesday, December 1, 2009

Homemade Hummus - a low fat recipe

Talk about easy. Making hummus can be summarized in three quick steps: 1) add ingredients to food processor, 2) puree, and 3) eat. But leave it to me to complicate things a little. I thought I'd at least try and lighten up this Middle Eastern staple. Which is not to say that I have anything against the traditional ingredients used in original recipes. The distinctive flavors of chick peas with creamy tahini and fresh parsley, served with warm pieces of pita bread, solicits day dreams of antiquated seaside villages, and brilliant, blue Mediterranean waters, permeated by the actual aromas of sesame, olive oil, and lemons.

Since my goal was to reduce calories, the first ingredient I manipulated was tahini. Tahini is simply toasted sesame seeds which have been ground into a paste. Sesame seeds are also used to make sesame oil so it follows that tahini would contain a good amount of fat. I decided to substitute it for greek yogurt. Low fat greek yogurt, in particular, because it contains just enough fat to lend a creamy texture to the dip but, at the same time, is not as high in calories as tahini. (One hundred and twenty calories per cup of low fat yogurt compared to eighty eight per tablespoon of tahini.)

Next came the lemon juice. I discovered Moroccan preserved lemons last spring and have been using it in most of my seafood dishes and stews, so I always keep some in my refrigerator. The preserving solution also comes in handy but not in a calorie-specific way. It simply imparts a strong, tangy flavor and can be used in most savory dishes that call for fresh lemon juice. But where can one find Moroccan preserved lemons, besides Morocco? They are not as elusive as the name might suggest. I know that Whole Foods carries it as do many imported food stores. But if you can't find them at all, go ahead and use the juice of fresh lemons - the fact that your hummus is fresh and homemade will eclipse any minor ingredient substitution.


Homemade Hummus
Makes approximately 2 cups

1 can chick peas
2 garlic cloves
1/4 plain greek yogurt*
2 tbsp preserved lemon juice **
1/4 cup chopped parsley
2 tbsp olive oil

1. Drain the chick peas from the can and add to a pot with just enough water to cover them. Boil for ten minutes. Drain and add to food processor with the garlic, yogurt, and lemon juice. Puree until smooth.
2. Fold in the parsley, and transfer to a serving bowl. Just before serving, drizzle with the olive oil and garnish with pickled peppers (optional.) Serve with pieces of pita bread or whole grain crackers.

* Here I used low fat greek yogurt for a lower calorie hummus but for the traditional version, simply use the same amount of tahini instead.

** If you can't find preserved lemon juice, use the juice of fresh lemons.

Saturday, October 17, 2009

Cooking for my father: a recipe for butternut squash curry


My father's visit, October 2009.

I'm a little late with posting because we had a visitor recently: my father. He was here for one very short, but lovely week. I don't see my family very often so, whenever it happens, I try to spend every minute that I can with them.

My father is the most emotionally collected person I know. He brings a sense of reason to every situation; nothing seems to faze him. And he always seems to be content with whatever he has and wherever he is at any given moment. Consequently, he is not the most adventurous type, preferring instead to keep his life simple and the way he has known it for years, in such ways as vacationing close to home, buying the same make of vehicle, and in his choice of clothing. It is the same with food. Trying to cook for him has always been a nervous endeavor on my part. My siblings and I think of him as a picky eater partly because he has always preferred the foods he grew up on. I think my mother and grandmother were the only people who got it right in his opinion. Or maybe he was just all too cautious about my sister's and my kitchen experiments. During my last trip to Trinidad, I remember preparing him a cup of tea the way he likes it: with sugar and milk (a legacy of the British) and yet, it wasn't good enough. And this was only tea, for crying out loud. Who gets tea wrong?

Needless to say, he took everyone by surprise with his recent interest in travel. Even more surprising was his changing attitude towards non-Caribbean food. His favorites are now Malaysian and Egyptian. Didn't see that coming. So, when he called to say that he would be visiting us this month, I was less nervous about cooking for him and more excited about having him try some of my new recipes and for him to understand and hopefully appreciate, my new approach to food. I had a couple recipes in mind - one I've made before (Maple Anise Braised Country Ribs) and a new one.

During the radio interview I had a couple weeks ago, Susan Berkson asked, "What would you cook with the vegetables available at the farmers' market this week?" I didn't hesitate for a second because I already had a plan for the season's most popular vegetable: squash. In particular, butternut squash - my favorite. Last year, I made Butternut Squash Creme Brulee practically every weekend for about two months. It has a smooth texture and is sweeter than most other squashes which worked well in that preparation. But this time, I was planning to make it into a curry, incorporating the flavors of onions, chili peppers and low fat coconut milk. More than that, however, I was planning to serve it to my father! Brave girl, that's me. I was thrilled that he enjoyed it and now that I know he is broadening his culinary horizons, I can't wait for his next visit to make some new recipes for him.


Butternut Squash Curry
Serves 4 to 5

1 butternut squash (peeled, seeded and cut into chunks)
3 tbsp olive oil
1 cup diced onion
4 cloves garlic, minced
3 tbsp curry powder*
1 1/2 cups low sodium vegetable broth
1 cup low fat coconut milk
4 -5 jalepenos, sliced (optional)
1/2 cup green onions, chopped

1. Place a large dutch oven or other deep pot over medium heat and add the olive oil, followed by onion, garlic, and half of the jalepenos. Cook for about five minutes until the vegetables soften. Stir often to prevent burning. Add the curry powder, stir to combine, and cook for an additional minute.
2. Add the chunks of butternut squash and turn to coat thoroughly with curry mixture. Add the vegetable broth and coconut milk, cover and cook for 20 to 30 minutes until the squash is soft but not mushy and the broth and coconut milk have made a thick sauce. Top with any leftover jalepenos and the green onions before serving.

*I use a curry powder blend common to the Caribbean, called Madras Curry. Other curry powders can also be used, such as the yellow curry blend sold in most spice or grocery stores.

Thursday, September 10, 2009

Stuffed Eggplant

For the past month or so, eggplants are in abundance at the farmer's market's in the twin cities. They come in many different shapes, colors and sizes. And it follows that each variety works best in certain dishes. Most are some shade of purple but you can now find green and even white varieties. For roasting and making dips, I prefer the larger Italian and purple bell varieties. And for stuffing, I find that the small, dark purple, egg-shaped Indian variety, also known as baby eggplant, works best. Because of their size, they cook faster and throughly without being over done and make serving more manageable.


The stuffing in this recipe is essentially mashed cumin potatoes from the post Cumin (Geera) Potatoes. However, since potatoes take on the flavor of whatever is added to it so well, you can probably substitute garlic or sun-dried tomatoes for the scallions here.


Stuffed Baby Eggplant
Serves 4 to 5

8 to 10 baby eggplant
1 1/2 to 2 lbs potatoes, peeled and cubed
2 tsp ground cumin
1 tsp ground chili peppers (optional)
1/2 tsp salt
1/2 cup chopped scallions


1. Using a damp paper towel, wipe the eggplants clean. Place one eggplant on a cutting board and cut horizontally down the middle stopping half inch before the stem. Rotate the eggplant ninety degrees and make another horizontal cut down the middle. What you have now is a criss-cross cut down the eggplant, separating it into four segments connected at the base. Repeat this step for the remaining eggplants. Lightly brush the insides of each with olive oil. Set aside until ready to stuff.
2. Boil the potatoes in enough water to cover them, until fork tender. Drain and mash until smooth. Set aside
3. Heat a large skillet over medium high heat and add two tablespoons of olive oil. Add the minced garlic and cook for a minute or two until light golden. Add the cumin and cook for additional two minutes, stirring frequently to prevent burning. Add the mashed potatoes, stirring well to combine the seasonings. Turn off the heat and stir in the chopped scallions.
4. Fill each eggplant with two tablespoons of the potato mixture, cleaning up any that sticks on the outside.
5. Return the skillet or another large pot to medium high heat, add three tablespoon of olive oil to the bottom, and place the eggplant in single layer. If they can't fit in a single layer, do two batches. Cook on each side for three minutes.


Monday, August 31, 2009

Peach Tart


Late year, we attended a wedding in Georgia in which, at both the rehearsal and reception dinners, peaches were incorporated in some form or the other. I remember it well because I liked the idea that the couple (although neither of them was from Georgia) included a memorable aspect of the state in their wedding details: Georgia peaches.

I do not think there is a dish that isn't made better by adding peaches. In this tart recipe, very ripe peaches are used for two main reasons: the sweetness and the texture. Since the pie isn't baked long enough to soften half ripened peaches, soft ripe peaches allow you to cut into it easily and serve immediately after assembling. Of course, other soft fruit can be substituted here, such as raspberries and nectarines.


Peach Tart
Serves 4 to 5

Crust
1 cup whole wheat pastry flour
5 tbsp unsalted butter (room temperature)
1/4 cup sugar
1/4 tsp salt

Filling
1 cup low fat milk
1 cup sugar
2 eggs
1 tbsp corn starch
2 tsp vanilla extract
3 ripe peaches, sliced
2 tbsp peach preserve (or other fruit preserve)

To make the crust:
Combine flour, sugar and salt, then cut in the butter until crumbly. Press unto the bottom and an inch up the sides of an 8 inch spring form pan. Bake at 350 degrees F for 10 to 15 minutes until golden brown. Cool on a wire rack until ready to use.

To make the filling:
1. Add the milk and half of the sugar in a sauce pan, over medium heat, and bring to a boil.
2. Meanwhile, whisk the eggs together with the rest of the sugar and the corn starch until the corn starch completely dissolves.
3. Once the milk begins to boil, remove a third cup and temper the egg mixture. Pour the tempered egg mixture back into the rest of the milk. Continue to whisk over medium heat, bringing the mixture back up to a boil. The cream should begin to thicken very quickly. Once you notice that it's not getting any thicker, remove from heat and transfer to a bowl. Cover with plastic wrap until ready to use; this prevents a skin from forming on the top.

To assemble the pie:
1. Pour the prepared cream unto crust, and arrange the peach slices decoratively on the top.
2. Melt the peach preserve in the microwave to a syrup-like consistency. Using a pastry brush, gently brush onto the peach slices.
3. Using a torch, scorch the tops of the peaches lightly. Alternatively, this can be done under the broiler for no more than three minutes.

Tuesday, August 25, 2009

What I learned from Michael Pollan (plus a recipe for Corn Mango Salsa)


On Thursdays, the farmer's market extends to Nicollet Mall in downtown Minneapolis. Although there are less vendors than the Lyndale location, there is still plenty of variety among the stalls. Last week, corn was on my mind. I figured better pick some up before the season's over.

Whenever I think of corn, I can 't help but be reminded of Michael Pollan's book In Defense of Food. Pollan describes in depth how corn rose from a weed to become one of the most successful species in the plant kingdom, with the help of industrial technology. He also provides good support for organic farming, highlighting that depending on the earth and the sun instead of synthetic fertilizers benefits not only our natural biologies but helps improve the condition of so many places on the planet that have been destroyed by industrial farming, or I should say ruthless industrial farming practices.

But the one point that really resonated with me was the comparison between Mexicans and North Americans. According to him, the descendants of the traditional Mayans today still refer to themselves as the corn people because of how dependent their diets were on corn. The startling fact, he pointed out, was that while the North American diet is not corn centric (in the sense that the real corn - kernels and cobs - don't typically play a featuring role on our dinner tables as it still does in Mexican meals) we have a much higher carbon thirteen (C-13) isotope concentration is our bodies which means that we consume more corn that the Mayans.

Let me attempt to paraphrase Pollan's explanation: Scientists are able to determine this by analyzing a small piece of our hair or a fingernail. Humans get carbon from the food we eat. In nature, there are two isotopes (different atoms of the same element having the same number of protons and electrons but a different number of neutrons) of carbon: carbon 12 and carbon 13. Most plants, through photosynthesis, use carbon 12, transforming it into food, in particular compounds that, at the molecular level, contain three carbon atoms. These plants are called C-3 plants. Corn, on the other hand, is a C-4 plant: it creates compounds with four atoms of carbon. While corn does use some C-12, it takes in more of the C-13 isotope. Hence, the higher concentration of c-13 to c-12 in a person's body is indicative of the amount of corn in his/her diet. (Whew! Hope that made sense.)

How can it be that North Americans consume more C-13 than Mexicans whose diets are more reflective of a relationship with corn? Don't we eat more wheat, more potatoes, more meat? The answer lies in corn's industrial role as the basis for most processed foods, as food for livestock, in most cereals, in high fructose corn syrup. While we have mostly moved away from corn in its natural state, we have simply moved towards corn-based products. Traces of corn can be found in the most unlikely of foods. Take crackers for example, the ones advertised as thin, whole grain and comes in a variety of flavors. They contain at least three ingredients derived, through highly complex chemical procedures, from corn. The most notable: high fructose corn syrup (I'll save my wrath on this most harmful of sweeteners for another post.)

While this post might give the impression that I am against the continued propagation of corn, I'm not. I like corn. Especially sweet, boiled, Minnesota corn. But the perception that this grain is so entrenched in the vast majority of foods found on supermarkets shelves makes me nauseated. Of course, corn's new role has much to do with economics and this will not change until there is concerted effort to move away from processed towards whole and natural foods. How about simply learning to enjoy foods in their natural state? In trying to do so, I am finding that some of my best meals are those simple ones.

Corn Mango Salsa
Serves 3 to 4

2 boiled ears of corn
1 large mango
1 large cucumber
1/2 cup chopped red onion
1/4 cup chopped cilantro
juice of 1 lime
1 tbsp sugar
1 tsp ground chilies
salt to taste

1. Carefully cut the corn kernels off the cob. Peel the mango and carefully slice off the flesh into cubes. Discard the seed. Peel and cube the cucumber. Place corn, mango, and cucumber in a large bowl along with the chopped onion, and cilantro.
2. Mix the lime juice, sugar, ground chilies, and salt. Pour unto the corn mixture. Toss well and serve.

Sunday, August 9, 2009

Farmers Market Yellow Bean Coconut Soup


There are may aspects of the Minneapolis farmer's market that I enjoy. The variety, of course. Stall after stall of fresh sweet corn, juicy heirloom tomatoes, and all manner and shades of greens and herbs. My first experience in an American farmers market was not here but in St Joseph, Minnesota where I attended college. A little background: this was a small college town with a couple bars, couple churches, one coffee shop and one grocery so you can guess that the options for fresh produce were minimal. Until summer came around and the farmers came out. It was as though I was tasting fresh food again for the first time. The Minneapolis version is like that for me but on a much larger scale. There is always something new and interesting to try and, consequently, some new inspiration. Last weekend, it was yellow string beans. (See recipe below for Yellow Bean Coconut Soup.)

Oddly enough, it is the size of the market that also attracts me. The sheer volume of people who throng the Lyndale location is unlike much of the city during the rest of the year, with the exception of the State Fair. Saturday morning crowds turn that part of town into a scene more characteristic to uber metropolises like New York City and Los Angeles. Maybe it's the fact that for most of the year nothing comes close to the the noise and outdoor energy that I just savor the congestion while it's here. Or the the notion that everyone there, at that one moment, is connected by the same purpose: searching our wholesome food, for themselves or to feed their families.

There are many more reasons we should try to eat locally, especially during the summer when it's more convenient. My feeling is that, more than anything, it bridges the gap between producers and consumers by allowing for direct contact between the two. These farmers bring high quality, wholesome, fresh foods to an area or population that otherwise would have had to pay more than almost twice the price in conventional grocery stores. Of course for many people, including myself, it is not always convenient to shop locally but when there's all of that fresh food and endless variety just a quick three and a half miles away, I just can't help myself.

Jennifer Wilkins of Cornell University makes a good case for eating locally. Click here to read her opinion piece. And here to find a farmers market close to you.


Yellow Bean and Coconut Soup
Serves 4

2 tbsp olive oil
1/2 cup diced onion
2 garlic cloves, minced
2 dried red chillies (optional)
4 basil leaves
1/2 tsp turmeric
1 lb fresh yellow string beans
3 cup low sodium vegetable stock
1 1/2 coconut milk (reduced fat)
salt and pepper

1. Heat a large stock pot over medium heat. Add olive oil, onion, and garlic. Saute for ten minutes until onions soften then add basil, turmeric and two thirds of the beans (chopped). Saute an additional eight to ten minutes to slightly soften the beans.
2. Add the vegetable broth and coconut milk, cover and bring to a boil. Lower the heat and simmer for eight to ten minutes.
3. Meanwhile, toss the remaining beans with two tablespoon olive oil, season with salt and pepper and roast in a 500 degree F oven until brown on the edges, about six to eight minutes Set aside until ready to serve soup.
4. To serve: puree the coconut-yellow bean soup base to desired consistency (I like it almost smooth and silky) and serve over a handful of the roasted beans.

Tuesday, May 19, 2009

Zucchini Flatbread and Tag: a game of getting to know more about our favorite bloggers.

A while back, I received the following fun exercise from Gera at Sweet Foods. The purpose: getting to know more about our favorite food bloggers. Now, it's my turn. Following Gera's example, I have attached some photos, some random ones chosen from a few of my trips.

First, though, here is my newest flatbread recipe: zucchini, almonds and mozzarella. Initially, I intended to make a simple zucchini flatbread but realized that I had a handful of slivered almonds left and not wanting them to go to waste ( nuts in general last a a good two or three months in the pantry, even longer in the freezer, before turning rancid) I added them to the mix. And not a bad idea either.


Zucchini Almond Flatbread
Serves four

1/2 cup whole wheat flour
1/2 cup all purpose flour
2 tsp active dry yeast
1 tbsp sugar
1/2 cup warm water
1/4 tsp salt
2 zucchini, sliced
2 cloved garlic, minced
2 tbsp olive oil
1/2 cup shredded mozzarella
1/4 cup toasted, slivered almonds


1. To make the dough: In a mixing bowl, add the water to the yeast and sugar, set aside until foamy, about 10 to 15 minutes. Add the flours and salt and mix into a ball. Remove to a flat, floured working surface and knead until soft and elastic about four to five minutes. Set in the mixing bowl that has been oiled. Cover and let rise for about an hour.
2. In a skillet set over medium heat, add the zucchini, garlic and oil. Cook until zucchini softens about three to four minutes. (It is not necessary to thoroughly cook the zucchini here because it will finish cooking in the oven.)
3. Roll the dough unto a well greased baking sheet to about one eighth of an inch thick. Evenly layer the zucchini and mozzarella. Finally, sprinkle the almonds. Bake at 450 degrees for ten to twelve minutes. Serve while still warm.

Now, on to the questionnaire.

Diamonds or pearls?
Not crazy about either.

What is the last film you saw?
Dark Knight

Your favorite series?
I'm a LOST junkie! It's the first series I actually followed from season one and I'm still hooked. Also watch Law and Order, CSI and anything interesting on Discovery and National Geographic.

What kind of breakfast do you have usually?
It depends on whether I'm eating alone or with my husband. Alone: some sort of cereal. With my husband: pancakes and omelette, or a traditional Trinidadian breakfast.

Lighthouse, Kauai.

Second given name?
Pearl. Yes, Pearl. When I was born, being her first granddaughter, my grandmother thought I was her little gem, hence "Pearl. " I'm just grateful Diamond or Gold didn't come to her mind.

Which kind of food can't you stand?
Processed food

Favorite name (at the moment)?
Don't have one.

Which car do you drive?
Acura.

Which trait or character don't you like?
Arrogance.

Star fish at Aquarium in Minneapolis.

Favorite clothes?
Badgley Mischka, Cache, Banana Republic, BCBG, Adidas.

If you could take the aeroplane to go somewhere, where would you go?
Tough one...Hawaii or Tahiti.

Sea horse at Aquarium.

Where would you want to live when you are retired?
Hawaii. I could seriously spend my days snorkeling, hiking the Na Pali cliffs, and eating fresh seafood.

Which birthday do you remember the most?
My last: my father and youngest sister had visited; I hadn't seen them in more than three years.

Your birthday?
October 10.

Shamu! San Diego.

If you were a color, which one would you be?
Red

Chocolate or vanilla?
Chocolate.

Coffee or tea?
Coffee! I started drinking coffee in college to stay up to study. Now, it seems I cannot start my day without a cup. Nothing fancy, just regular coffee; I grind my own beans though. I do have tea on most evenings.


Feeding the animals, Wild Animal Park, San Diego.

The last person you had on the phone?
My sister Nancy in Toronto. We speak to each other almost everyday.

Sweet or savory?
Sweet! My sweet tooth is going to be the end of me.

The day of the week you prefer?
Wednesday night because LOST is on!

Now, let's find out more about:
Sarah at Broken Yolks
Zerrin at Give Recipe

Saturday, May 9, 2009

Sauteed Spinach with Whole Garlic and Raisins


I'm excited to be staying in tonight. You see, for the past two weeks we had been eating out every night. As much I enjoy the Minneapolis restaurant scene and eating out in general- especially now that it's almost summer and outdoor dining is the rave- the comfort of my apartment and my little kitchen is more appealing right now. On the menu tonight: sauteed spinach with whole garlic and raisins. Not very alluring, I know, but very simple and delicious. Just what I want after a slew of large and involved meals. 


Sauteed Spinach with Whole Garlic and Raisins
Serves two to three

5 cups fresh spinach, washed and drained 
6 garlic cloves
1/4 cup dark raisins
salt to taste
grated parmesan 

1. In a skillet set over medium high heat, add two tablespoons vegetable oil. Add the garlic and cook for three to four minutes, until they turn lightly brown.
2.  Add the raisins, cook for another minute or so until they plump up. Now,  add the spinach. Cook until they wilt, season with enough salt to taste, and serve with grated parmesan on top. 

Tuesday, April 7, 2009

One a Penny, Two a Penny, Hot Cross Buns


Growing up, I didn't care much for Easter egg hunts and Eater bonnets. For me, Easter began when our next door neighbor sent over freshly baked hot cross buns on Good Friday morning. Warm, nutmeg -scented, raisin -heavy buns topped with a smooth, gooey glaze made even more gooey by the still warm buns. Hers were the best. I remember one Good Friday morning foregoing breakfast just so that the firs thing I could savor that morning was one of those buns.

So you could imagine my surprise, and disappointment, upon realizing that hot cross buns are not as popular here in the States as they are in the Caribbean, or in the Commonwealth of Nations (former British colonies) for that matter. The British left their mark in more ways than one in those places. The judicial system, education, sports- ever heard of cricket? - religion and food. (The title of this post is also British; from an old nursery rhyme.) In the case of hot cross buns, the last two are closely connected: they were only eaten on Good Friday because, in Christianity, the cross symbolized the crucifixion of Jesus Christ. However, these breads dated as far back as pagan times when early Anglo-Saxons eat them in honor of the goddess Eostre. The difference was that the cross was not a crucifix at all but two intersecting lines used to symbolize the four corners of the moon.


Ready to be baked

At its inception, the symbolic cross was carved in with a sharp knife, not marked with icing as is done today. (I prefer the change to icing better!) In this recipe, the dough is extra sticky and has the potential to get messy but it will be worth it in the end. They taste better warm, like all bread, but can be frozen and keep for up to two weeks.

Ready to be eaten

Hot Cross Buns
Makes 12 large or 24 small buns

2 1/2 to 3 cups all unbleached all purpose flour
1 tsp cinnamon
1/2 tsp nutmeg
1/4 tsp allspice
1/8 tsp ground cloves
1/2 tsp salt
1/2 cup warm skimmed milk (80 degrees F)
1 tbsp active dry yeast
1/3 cup sugar
2 eggs
3/4 cup sour cream
1 tsp vanilla extract
1/2 cup dark raisins or currants
1 egg white

Glaze:
1/3 cup confectioners sugar
2 tsp milk
1 tsp orange extract or juice

1. Sift together flour, spices and salt. Set aside.
2. Add the warm milk, yeast and 1 tbsp of the sugar to the bowl of a standing mixer, stir lightly with a spoon and allow the yeast to bloom, about 10 to 15 minutes. Add eggs, sour cream and the remaining sugar. Using the paddle attachment mix until just combined. Replace the paddle with the dough hook attachment.
3. Now add the flour and knead on low for five minutes. Do not be to alarmed if you find that the dough is sticky; this is a wet and sticky dough. Remove the mixing bowl with dough to a dry place in the kitchen, cover and allow to rise until doubled in sized, between 1 to 2 hours.
4. Set the oven to 400 degrees F. Now return the dough in the bowl to the mixer and add the raisins or currants. Mix for two more minutes until all of the raisins have been evenly incorporated into the dough.
5. Transfer the dough to a floured work surface and lightly pat into an evenly round mass, using extra flour from your work surface to prevent sticking. Cut into 12 large pieces or 24 smaller ones. Shape each piece into a ball and transfer to a well greased baking dish so that they barely touch one another. Cover, set aside and allow to rise for another 1 hour.
6. Brush tops with egg whites and bake at 400 degrees F for 10 minutes. Reduce oven to 300 degrees F and bake for a further 10 to 12 minutes. Remove the baking dish from the oven and transfer unto a cooling rack. Cool buns for 2 to 3 minutes in dish, then remove and cool directly on the wire rack. While they are still warm to the touch, drizzled the glaze in a cross pattern on each bun. Serve.

To make glaze: Mix all ingredients until well combined.


Thursday, January 29, 2009

Kalamata Olive and Date Tapenade


Tapenade is a staple appetizer at many a dinner party. And more often that not, this tapenade is store bought. Sad. Since it is unbelievably easy to make.  I'm sure if you were to look in your pantry, you will find that you already have the ingredients to make a perfectly decent, perfectly gourmet-store-worthy hor d'oeuvre. But don't just stop there. Use as a sandwich spread, in soups, tossed in pasta. The possibilities are endless. 

I have used kalamata olives here because they are sweeter than most other olives. Paired with dates, it produces a relatively fruity tapenade. However, you can use any olive on hand, paired with another dried fruit such as raisins or figs. Or take a savory approach with artichoke hearts, roasted red peppers, or even cocktail onions. You simply can't go wrong here. 

Kalamata Olive and Date Tapenade
Serves 4 to 5

1 cup pitted kalamata olives 
1/4 cup pitted dates
1 tbsp capers
2 tbsp olive oil
2 small cloves garlic, minced
1 tsp sherry (optional)

Soak dates in one cup of hot water for fifteen minutes. Drain. Add to food processor with remaining ingredients. Puree and pour into serving dish. Serve with dry toast or multigrain crackers. 

Saturday, October 25, 2008

I'm back with Stuffed Mushrooms


As you may have known, my sister had been visiting last month. Consequently, I have been so busy with her, sightseeing, shopping, helping her study for the SAT's (which is a mute point now since she was accepted to medical school- an international one) etc. So my blogged suffered; I had not been able to post since October 15th. I'm not complaining either because I enjoyed every minute spent with her. It is questionable, however, whether or not she enjoyed every minute with me. (Moody, exacting, and bossy are a few adjectives she would gladly use to describe me.)

She was thrilled with the restaurant scene in Minneapolis; a huge difference from what she was used to. Not only the setting but in terms of the variety. She also enjoyed my home cooking, something she didn't know much of since I left home before she was able to appreciate my recipes. Luckily, she devours everything I make; I little bit of affirmation that I, in turn, enjoy. This recipe was created just for her.

Tofu and mushrooms. Two foods eaten in Trinidad but not widely popular. Consequently, and coupled with the fact that she is sometimes a picky teenage eater, she was not particularly fond of the idea that I would "make" her eat it. ( One of the reasons I doubt she enjoyed every minute with me: there was no " I don't like that" protesting allowed when it came to healthy eating.) In the end, I won he over with fresh portabello mushrooms. "I have never meet a mushroom I didn't like,"she said.

Marina's Stuffed Mushrooms

15 to 20 baby bellas
3 large portabellas
12 oz extra firm tofu
1/3 cup panko bread crumbs
1/4 cup chopped scallions
1/4 tsp salt
1/2 tsp ground pepper
1/3 cup grated cheese
grape seed oil (optional)


1. Remove the tofu from its package and wrap in dry paper towels. Place on a plate and set another plate on top of it. Onto the second plate, set a heavy weight such as a can of beans. Place in the refrigerator for at least an hour. This step is very important because it removes most of the extra liquid from the tofu resulting in a crumblier and less soggy topping.
2.Set the oven to 400 degrees F. With a damp paper towel, gently wipe any dirt off the outer surface of each mushroom. Remove and discard the stems. Set on a well greased baking sheet or baking dish.
3. Remove the tofu from the refrigerator (from its homemade "liquid extractor") and crumble into a bowl, either using your hands or a fork. To this crumbled mass, add the cheese, scallion, bread crumbs, salt and pepper. Mix well.
4. Fill each mushroom cap with the crumbled tofu mixture, and drizzle lightly with grape seed oil, if using. Bake for 15 to 2o minutes until lightly golden brown on top.


Monday, September 22, 2008

Cauliflower Gratin


If there is one vegetable that I can do without, it would have to be the cauliflower. To me, the taste is not anything to write home about.  My fiance, on the other hand, likes all vegetables.
Whenever he tags along on  grocery  trips, he endeavors to pick up at least one of every type of vegetable in the produce section. Consequently every couple months or so, I have this large cauliflower in the fridge starring back at me until I decide to cook it. 

Typically, we would have it blanched served with different sauces  on the side or cooked in n indian curry, such as  aloo gobi (potatoes and cauliflower.)  Still, it wasn't something I craved. Then not too long ago, I prepared it au gratin, in a recipe that I typically reserve for potatoes or summer squash. What a difference preparation makes! I will admit, this way is much tastier than blanched and has opened up a new way for me of thinking about this vegetable. In fact, I look forward to experimenting with all the different and tasty ways in which this vegetable, that was once so low on my grocery list, can be prepared. The more I think of it, the more I'm grateful for my previous aversion to cauliflower; this way, my approach can be from a clean slate, or should I say, from a clean plate. 

Cauliflower Gratin
1 large cauliflower
1 tbsp olive oil
1/2 cup diced onion
1 large bay leaf
1/2 tsp dried thyme
1 cup vegetable stock
2 tbsp all purpose flour
1/4 tsp grated nutmeg
1/4 tsp tsp chilli powder

For topping
1/2 cup panko bread crumbs
1/2 cup grated cheese (of your choice; I like a mixture of mild cheddar and parmesan)
1/3 cup sliced, fresh scallions


1. Mix all the ingredients for the toppings and set aside.
2. Cut the cauliflower in half and remove the hard stem. Proceed to break apart florets into two to three inch pieces. Place about 1 cup of the florets into a food processor together with the diced onion and garlic cloves. Mince thoroughly. 
3. In a large skillet over medium high heat, add olive oil, minced mixture, bay leaf and dried thyme. Cook for 10 to 15 minutes until most of the liquid has evaporated and the mixture now appears dry and crumbly. Also, remember to stir frequently to prevent burning. Add the vegetable stock and cook for an additional 4 to 5 minutes. At this point, thoroughly whisk in the flour and nutmeg,  and remove the pan from over the heat. 
4. Steam the remaining cauliflower in a bamboo or metal steamer for three to four minutes, until slightly fork tender but not too soft. Toss steamed cauliflower pieces and onion-cauliflower mixture in a large bowl. Pour into a baking dish and top with panko topping. Bake at 400 degrees F for 20 to 25 minutes. 


Tuesday, September 16, 2008

Roasted Mushrooms with Shallot Chilli Oil

Clockwise from right: shiitaki, enoki, button, and oyster mushrooms

It all started a month ago. We had just sat down at one of our favorite (athentic) chinese restaurants and was in the middle of giving our order to the waitress. Hot and sour szechuan soup, ma po tofu, pea-tips in garlic sauce. "Oh, I'm sorry," she said to me in a hushed voice, "the pea-tips are not great today, wait until September when they are good and mature." Disappointment. Disappointed because those soft, leafy greens were the reason I cajoled my fiance to make the twenty minute trip to Richfield. 

On the drive home, we decided that in a month we would make a trip to the asian supermarket for some of those mature pea-tips. Taking the waitress' words to heart, last Sunday was the day we designated for the asian market. All month I had been looking forward to this day, which turned out to be a bleak and raining day. I was not fazed; that evening we were going to dine on crisp pea tips sauted with garlic and drizzled with a little  olive oil. 

So you can only imagine my disappointment at the sparse vegetable selection that awaited us. (Sparse is putting it subtly.) The vegetable shelves were practically bare, the pea-tips leaving much to be desired. It took me a few moments to contain my disappointment and make the most of the circumstances. We were already there, why not take this opportunity to stock up on some other asian ingredients such as sauces and our favorite roasted, brown rice tea. We eventually left with bottles of ponzu, various teas and  an assortment of mushrooms, the one vegetable that was fresh and plentiful that day.  


Roasted mushroom medley

6 oz enoki mushrooms
6 oz shiitake mushrooms
6 oz oyster mushrooms 
6 oz button mushrooms, slices
1/4 cup ponzu
2 - 3 tbsp chilli oil (depending on desired level of heat)
1 shallot, thinly sliced


1. With a damp paper towel or tea cloth, clean mushrooms lightly to remove any dirt. 
2. Toss with ponzu. Evenly spread the mushrooms onto a baking sheet and broil in the middle of the oven for 5 minutes. Remove from oven and set aside.
3. Meanwhile in a hot skillet over medium heat, (it is important to heat the skillet before adding the oil) add the chilli oil and shallots. Cook shallots for 1 minute, without stirring, just long enough to infuse the oil with its flavor. 
4. Pour hot oil and shallots over mushroom. Serve immediately. 

Sunday, September 7, 2008

Nectarine chutney and a short history lesson


For the past week or so, there was a box of fresh nectarines sitting on my kitchen counter. Every morning I passed by them, I thought about making a pie or galette. Eventually, I decided against this, however, because I am home alone during the day, each day this week. Nothing is worse than being home alone, bored, with pie in the refrigerator. So I decided to make a chutney. That way, it can be bottled and shared with my lucky friends.

Chutneys are very much a part of Indo-Trinidadian cuisine. It is often served on the side with almost everything: curried meats, vegetables, and even street foods and non- Indian foods. The most popular ones are mango, cucumber, and, my favorite, coconut. This recipe is a variation of mango chutney. The spices used here are easy to find in your neighborhood grocery store, with the exception, maybe, for amchar masala which can be found at West Indian grocery stores. If you are adventurous, you can make you own. I found a simple recipe at GourmetSleuth.

This blend of masala is unique to Trinidad and Tobago. The history behind it is quite interesting actually.  In 1845, after the abolition of slavery in the Caribbean, workers were still needed on the sugar cane plantations. Enter: East Indian indentured laborers. They brought with them much of their Indian culture: religion, food, dance, dress, language. Indentureship ideally should have lasted for five years but many chose to remain on the islands instead of returning to India, for different reasons. Some feared not regaining their social status upon their return, others had nothing to return to (the reason they left in the first place) and yet others contemplated renewing their indentureship to earn more money and return at a later date, only that date was postponed  so many times until all thoughts of returning faded. Much to the benefit of our island culture.

Amchar masala was one of the many spices brought from India. Each cook has his/her own uses for this particular blend of spices. In my family, we use it mostly in relishes and chutneys, and to season meats. It is quite versatile so if you do mange to get your hands on a package or make your own, feel free to experiment. 

Nectarine Chutney
Makes about 5 cups

2 tbsp vegetable oil
1/2 tsp fenugreek seeds
1/2 tsp mustard seeds
5 garlic cloves, minced
1 red onion, thinly sliced
4 whole cloves
3 cinnamon sticks
1 inch piece scotch bonnet pepper
1 1/2 cups water
1/2 cup apple cider vinegar
1/4 cup white wine
1/3 cup brown sugar
1 tsp ground coriander
1/2 tsp amchar masala
6 nectarines, chopped into 1/2 inch cubes


1. In a stock pot over medium heat, add vegetable oil and fenugreek and mustard seeds. Once seeds begin to pop, add minced garlic, sliced onions, cloves, cinnamon sticks, and scotch bonnet. Cook for 15 to 20 minutes until onions have softened, stirring occasionally.
2. Meanwhile in a large bowl, dissolve sugar in water, vinegar and white wine. Set aside.
3. Once onions have softened, stir in nectarines, masala and coriander. Add liquid mixture, stir, cover and bring to a boil. Reduce heat to low, and cook for approximately 1 hour until chutney thickens  and nearly all the liquid has evaporated.
4. Pour into sterilized jars and seal tightly.