Showing posts with label gourmet. Show all posts

Friday, October 2, 2020

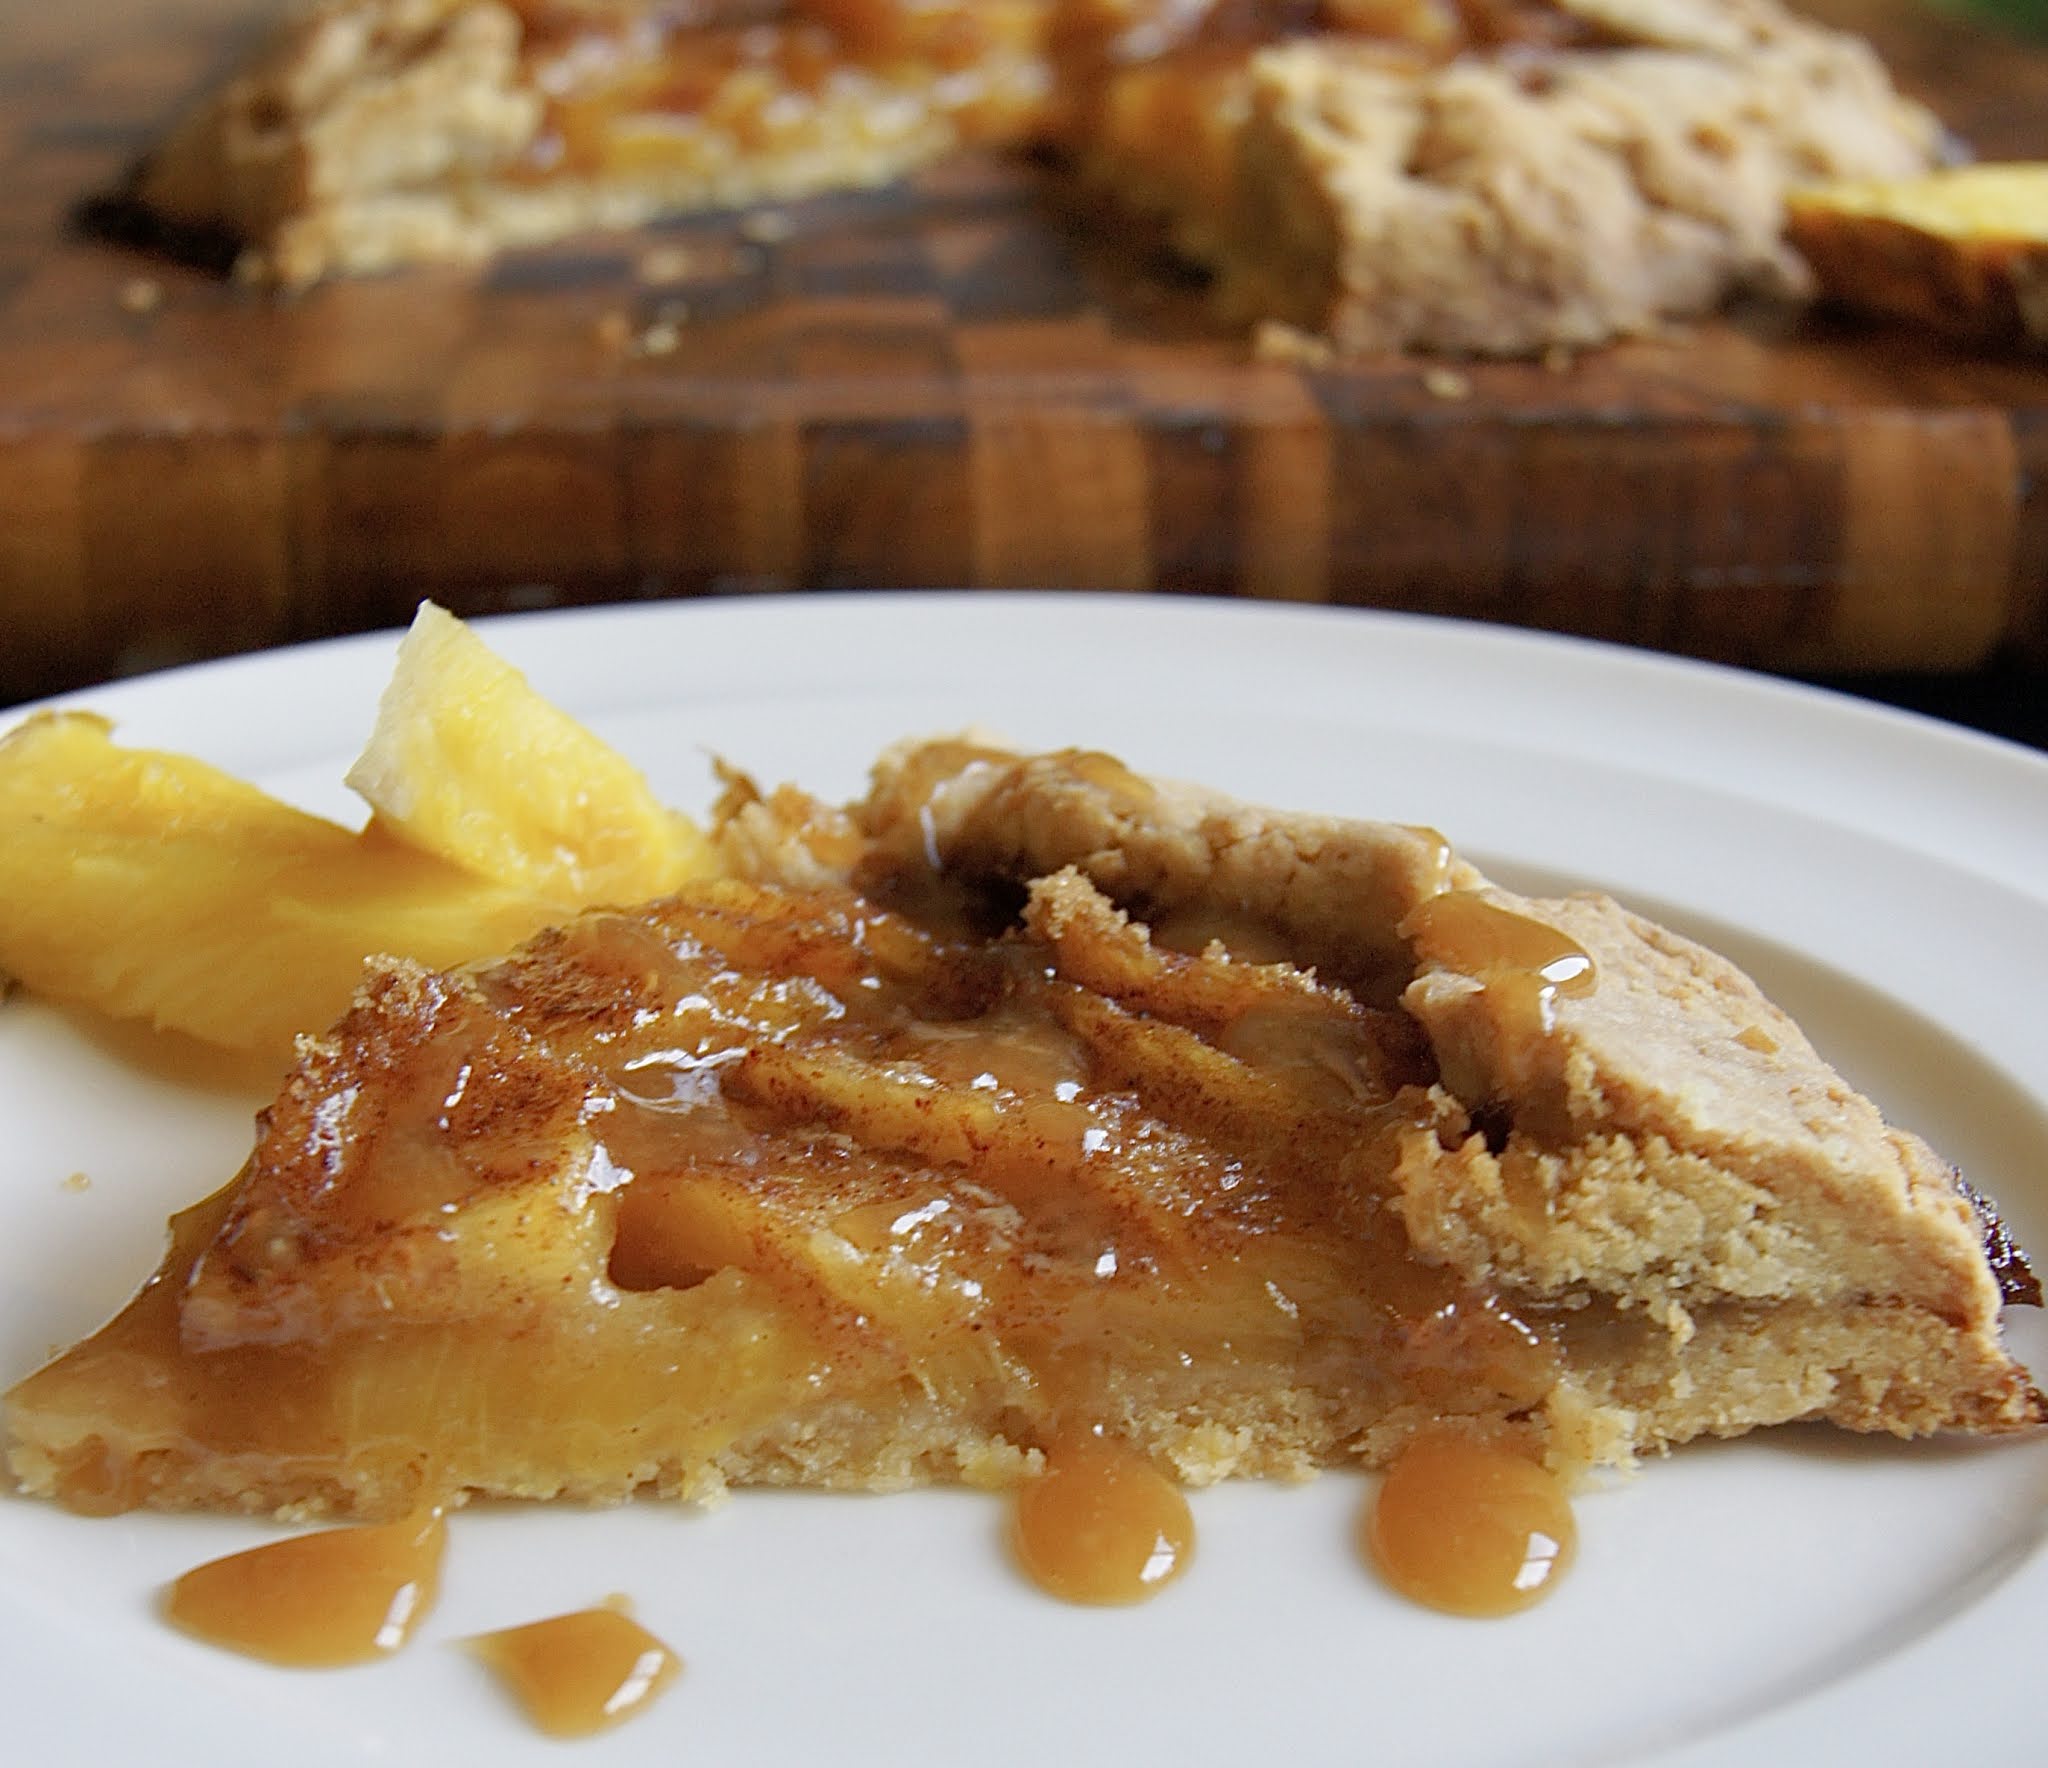
Pineapple Galette


If this were an ordinary year, my family would have been planning a trip to some warm location come fall and winter. But due to the current pandemic, we have been staying close to home and plan to do so for quite a while. So, since we can't be in the tropics, we are channeling tropical vibes and flavors in many of our dishes! 

This pineapple galette is one such dish. Filled with fresh pineapple, sweetened coconut flakes in the crust, and a good pinch of nutmeg, it is reminiscent of the homemade pineapple jam of my childhood in Trinidad - one that, as kids, we would slather unto toast for breakfast. As an added touch, I served it drizzled with a bit of caramel sauce, using this very easy recipe. Also, I am very proud to admit that my 5 year old, who is usually by ym side when I'm baking, offered the most helpful tip with the crust. Instead of trying to lift it unto the baking, simply place the baking sheet at the edge of the counter and gently slid the rolled out crust unto it. Easy squeezy, like he would say. 


Pineapple galette 

For the crust:
1 cup whole wheat pastry flour 
1/2 cup sweetened, shredded coconut 
5 tbsp butter, cut into cubed 
2 to 3 tbsp cold water

For the filling: 
2 cups sliced, fresh pineapple
1/3 cup brown sugar
2 tsp cinnamon 
1/2 tsp grater nutmeg 
2 tbsp cold cutter, cubed

To make the crust:
1. In a food processor, pulse the flour and shredded coconut together until you can no longer see whole shreds of coconut flakes. Add the cubed butter and continue pulsing until the mixture becomes crumbly and takes on the texture of course meal. With the motor running, add two to three tablespoons of ice cold water to the mixture, keeping the motor running just until the mixture begins coming together, not more than 20 to 30 seconds. 
2. Turn the mixture out unto a lightly floured surface, and using your hands bring together to form a ball. wrap with plastic wrap and refrigerate for 30 minutes. 

To assemble the tart:
1. Mix the sugar and spices in a bowl and set aside. 
2. On a lightly floured surface, roll the crust out into a 10 inch circle, about 1/4 inch thick. 
3. Carefully transfer the crust unto a lined baking sheet. (Alternatively, since the crust can be a bit soft and tricky to work with,  tape a sheet of parchment paper (the size of your baking sheet) unto your work surface. and roll out the dough onto the paper. Then, remove and discard the tape, and transfer the parchment paper together with the crust unto your baking sheet.)
3. Arrange the pineapple slices on the tart crust, leaving about a 2 inch border all around. Sprinkle the sugar mixture on top of the pineapple and dot with the cubed butter. Fold the border up over the edge of the pineapple filling, making sure to leave much of the fruit uncovered. Bake in a 375 degree oven for about 50 minutes until the crust is golden brown. Cool on a wire rack for 10 to 15 minutes before serving. 

Monday, July 10, 2017

Raspberry Cake


It is only fitting that my previous post and this current one are about raspberries. After all, my blog entires have been few and far between ever since my life became consumed by a messy-haired, rosy-cheeked, ever-happy toddler. This same toddler is also a raspberry fanatic. He had been at the time of my previous post and and still is today. So, imagine his delight when, about a week ago, we took him to a raspberry patch to pick his favorite berries to his heart's content. Decked off in his favorite green rain boots and blue hat, he quickly got the gist of how to gently pluck the berries off the branch so that the hull remained, as well as discerning those that were ready to be picked from those that were not. Truth be told, I did not expect him to be able to fill up his basket but fill he did. He also knew, instinctively, that no amount of berry picking is complete with bit of tasting as you go. But in spite of all the tasting, we ended up taking home three pints of delicious local raspberries which was more than enough to make this equally delicious cake. A cake which,  incidentally,  is toddler approved. 


Raspberry Cake
Adapted from Epicurious

1 cup all purpose flour
1/2 tsp baking powder
1/2 tsp baking soda
1/4 tsp salt
1/2 stick unsalted butter, at room temperature
2/3 cup plus 1 1/2 tbsp sugar, divided
1/2 tsp vanilla 
1 egg
1/2 cup milk
1 1/2 to 2 cup fresh raspberries 

1. Preheat oven to 400 degrees F. Grease and flour a 9 inch round cake pan. 
2. Whisk together flour, baking powder, baking soda, and salt. 
3. In another bowl, beat butter and 2/3 cup of sugar with and electric mixer until pale an fluffy, about 2 minutes, then add the vanilla and egg. Continue to beat well. 
4. Turn the electric mixer speed to low, and mix in the flour mixture in 3 batches, alternating with  milk, and beginning and ending with the flour mixture. 
5. Pour the batter into the cake pan, gently smoothing the top. Scatter the raspberries evenly over the top and sprinkle with the remaining sugar. 
6. Bake until the  cake is golden and a toothpick inserted into the middle comes out clean, about 25 to 30 minutes. Cool in the pan for 10 minutes, then turn out unto a wire rack and cool for an additional 10 to 15 minutes. 


Friday, July 2, 2010

Fresh Strawberry Tart with Port Glaze


Last Wednesday, after a lazy morning of coffee, exercise, and brunch, we drove to the town of Delano (about fifty miles west of Minneapolis.) The quest: strawberries-picking at Apple Jack Orchards. Now, I've never been berry-picking before, but I expected fun to be had. Wide open spaces, fresh air, sweet fruit,and the satisfaction of comes with an awareness of the natural environment.

Not entirely the case. I would suggest embarking on this endeavor in the early morning or late afternoon. Not at midday when the sun is at its hottest. I always get asked, "But you are from the Caribbean, don't you like being in the sun? " Sure I do but physical activity in ninety degree heat can make even the most avid of sun worshippers a bit miserable. And, after all of that, a bee got caught in my hair and as I tried to free it, the little punk - I mean the cute, fuzzy, sweet-honey-producing bee - stung me! (Another suggestion, if you have long hair, tie in a pony tail or braid before strawberry picking.) Luckily, I'm not allergic to bee stings but never again will I complain about strawberry's high price. Locally grown strawberries are worth every cent.

All in all, the day wasn't a total disappointment . Even though it was the end of the season and most of the fruit were already gone by the time we got there, we (and by we, I mean mostly my husband) still managed to gather about three pounds. More than enough for this scrumptious tart.

My recipe is an adaptation of one I saved from a 2009 issue of Gourmet magazine; changing only a couple things. I added whole wheat pastry flour and cinnamon to the crust, and I tossed the berries with fresh mint for the filing, just to add another dimension of flavor and freshness.

Freshly picked, from the farmers market, or store bought, do try and get some local strawberries before the season is completely over. And if you do decide to drive to Apple Jack's Orchard, try their strawberry tart. Theirs is freshly made, and very good too!


Fresh Strawberry Tart with Port Glaze
(Adapted from Gourmet)
Serves 8

FOR TART SHELL
1/2 cup whole wheat pastry flour
3/4 cup all purpose flour
2 tsp ground cinnamon
3 tbsp brown sugar
1/4 tsp salt
7 tbsp unsalted butter, cut into 1/2-inch pieces
1 egg yolk
1/2 tsp vanilla extract
zest of 1 lemon
3 tbsp cold water

FOR FILLING
1 1/2 lb strawberries (trimmed)
1/3 cup brown sugar
1/2 cup port
1 cup mascarpone
1 cup fat free cream cheese (softened at room temperature)
1/3 cup confectioners sugar
2 tsp lemon juice
zest of 1 lemon
1 tsp pure vanilla extract
about 10 mint leaves

TO MAKE TART SHELL
1. Combine pastry and all purpose flours, salt, and butter in a bowl using your fingers, pastry blender, or food processor until mixture resembles coarse meal with some lumpy pea-sized butter bits.
2. Beat together yolk, vanilla, lemon zest, and water, then drizzle over flour mixture and stir until mixture comes together. Gently knead dough on a lightly floured surface until a dough forms. Press into a 5-inch disk.
3. Place dough disk in center of tart pan and cover with plastic wrap. Using your fingers or the bottom of a measuring cup, spread the dough to evenly cover the bottom and sides of pan. Prick bottom of shell with a fork and freeze until firm, about 10 minutes.
4. Pre-heat to 375 degrees F, with rack in the middle. Line tart shell with foil and pie weights and bake until sides are pale golden about, 20 minutes. Remove foil and pie weights and continue to bake until deep golden all over, another 15 to 20 minutes. Cool in pan, about 45 minutes.

TO MAKE PIE FILLING (while tart shell cools):
1. Stir together strawberries and brown sugar in bowl and let stand about 30 minutes, stirring occasionally. Strain liquid into a saucepan, reserving berries. Add port to liquid in pan and boil until slightly thickened and reduced by half, about 10 to 15 minutes. Transfer to a small bowl to cool slightly.
3. Tear the mint leaves into thin strip and toss in reserved berries.
2. While port glaze is cooling, blend together mascarpone, cream cheese, confectioners sugar, lemon juice, zest, and vanilla until thoroughly incorporated.

To Assemble Tart:
Spread mascarpone-cream cheese mixture evenly in cooled tart shell. Top with strawberries, and drizzle with port glaze.

Friday, May 15, 2009

Balsamic Syrup for Fresh Fruit

Strawberries with balsamic syrup

When I was seventeen, I lived and worked in Toronto for five months. It was a period of time right after high school when I hadn't yet decided if I wanted to remain in Trinidad or move abroad for college. So, I went to Canada. ( Supposedly the next best logical step considering I had many relatives there who would keep me in line, or so my parents hoped .) 

After a month of sightseeing and catching up with relatives, it was time to get a part time job. That way, if I  decided to go to college there, I would already have an idea of how the city works.  My job: quasi sales girl for a small company that sold Indian spices, sauces, and chutneys. The owner travelled around the country to trade shows promoting and selling her products; I started working with her at the Convention Center in downtown Toronto. 

So, there I was, in one of the most vibrant cities in the world, with the best options for food and the one thing that I gravitated towards was...chocolate covered bananas. A few yards  down the aisle from our booth was another booth that sold all sorts of chocolate covered fruit, from bananas to pineapple to peaches. Every day after lunch I would buy some sort of chocolate covered confection. Small wonder I gained close to twenty pounds during those five months. 

Now, whenever I feel for a chocolate banana, I make this balsamic syrup that substitutes well for the chocolate and also goes great with almost any fresh fruit. That is not to say I  don't have the real stuff once in a while. :o)

Bananas with balsamic syrup and toasted  almonds


Balsamic Syrup

1/2 cup balsamic vinegar
1/4 cup maple syrup
1/2 tsp vanilla extract
fresh fruit (strawberries, bananas, peaches, etc)


Add the balsamic vinegar and maple syrup to a heavy sauce pan set over medium heat. Cook for 7 to 8 minutes until thick and bubbly.  Stir in the vanilla and serve immediately over fresh fruit or ice cream. 

Monday, February 9, 2009

Pomegranate Series Part 1: Poached Pears

It has been almost four years since I have modified my eating habits and the way I cook. My belief is that healthy food does not have to be boring or taste bad. And a healthy lifestyle does not mean absolute restrictions. I allow myself to indulge sometimes, sometimes maybe too much. Nonetheless, I have tried to reflect these beliefs here. I was humbled that the people at POM Wonderful, specifically Diana, recognized my efforts and offered to send me a case of their one hundred percent pomegranate juice to help with this endeavor. Now, let me tell you, pomegranates are rock stars in my kitchen so you could imagine how thrilled I was to receive this gift. I could not wait to begin cooking with it. This is part one of a series of dishes made with pure pomegranates (the juice and fruit forms.) I will try my best to present them consecutively but don't hold me to that.

Pomegranate juice can be used for more than the occasional cocktail. The health benefits are also spectacular. A slew of clinical studies has been conducted on the medicinal properties of this juice with positive results in the areas of cardiovascular health, prostate health, erectile function, and antioxidant potency.

Antioxidants are molecules found in our bodies and in food that slow the process of cellular oxidation. Basically, when cells use oxygen , they release highly reactive atoms or molecules called free radicals. Some free radicals are important in biology but there are others whose side reactions can be detrimental to our health. For example, free radicals are thought to function in some cancers, and diseases such as atherosclerosis and Parkinson's disease.

Antioxidants function to neutralize some of these harmful free radicals. While there are natural antioxidants in our bodies, many come from the types of foods we eat. Green tea, red wine, grape juice all contain some form of antioxidants. However, pomegranates contain higher concentrations than any of those. If that alone is not a reason to indulge in this fruit, I don't know what is.

For more information on the many health benefits of pomegranates, click here.

Pomegranate Poached Pears
Serves 4

4 bosc pears
2 cups 100 % pomegranate juice
1/4 cup sugar
2 whole star anise
1 piece of cinnamon stick (about 3")
1/2 cup sherry

1. Peel pears, being careful to retain the stem.
2. In a large pot over medium heat, combine the remaining ingredients and bring to a boil. Reduce heat to medium low and add the pears. Cook for 20 to 30 minutes, turning occasionally. Cook until the pears are tender, not soft and mushy.
3. Remove pears, cinnamon stick and star anise from the liquid. (Refrigerate pears in an air tight container until ready to serve.) Increase heat to medium high and allow to cook until the liquid has thickened to a syrupy consistency, being careful not to burn.
4. To serve, arrange a single pear and a scoop of mascarpone cheese (optional) on a serving plate, and drizzle with two tablespoons of syrup. Alternatively, pears can be served on a mixed greens salad with goat cheese and pomegranate seeds as pictured below.

Thursday, January 29, 2009

Kalamata Olive and Date Tapenade


Tapenade is a staple appetizer at many a dinner party. And more often that not, this tapenade is store bought. Sad. Since it is unbelievably easy to make.  I'm sure if you were to look in your pantry, you will find that you already have the ingredients to make a perfectly decent, perfectly gourmet-store-worthy hor d'oeuvre. But don't just stop there. Use as a sandwich spread, in soups, tossed in pasta. The possibilities are endless. 

I have used kalamata olives here because they are sweeter than most other olives. Paired with dates, it produces a relatively fruity tapenade. However, you can use any olive on hand, paired with another dried fruit such as raisins or figs. Or take a savory approach with artichoke hearts, roasted red peppers, or even cocktail onions. You simply can't go wrong here. 

Kalamata Olive and Date Tapenade
Serves 4 to 5

1 cup pitted kalamata olives 
1/4 cup pitted dates
1 tbsp capers
2 tbsp olive oil
2 small cloves garlic, minced
1 tsp sherry (optional)

Soak dates in one cup of hot water for fifteen minutes. Drain. Add to food processor with remaining ingredients. Puree and pour into serving dish. Serve with dry toast or multigrain crackers. 

Friday, January 23, 2009

Green Pea Croquettes with Chevre


In the spirit of change, we decided to become vegetarian. No red meat, no poultry but maybe seafood. This was more of a health related decision than anything else. I am not sure why we had not done this before. After all, we typically ate meat once a week (except during the holidays when, I admit, it gets a little out of control) and whenever we dined out. Do I think we will miss meat? Do I think it will be a difficult change? On the contrary, I accept this as a interesting culinary challenge. Another reason to be creative in the kitchen.

After the first two weeks as an official vegetarian, it became obvious that, just as was suspected, this was not going to be very difficult. First, we were doing it together. That way, we can keep each other in check, and offer support and a gentle reminder when the other (usually me) behaves like an omnivore. Second, vegetarian options are endless and adding just a few key ingredients can turn a boring or over-done dish into an exciting new dinner staple. Like these croquettes.

Croquettes are typically cylindrical or circular disks of food, breaded and deep fried. While mashed potatoes and meat are typically the base, other ingredients can be substituted. And while deep frying is rarely undertaken in my home, I have found that the same crunchiness is achieved by searing in a little oil on high heat. Here, green peas are the base and soft goat cheese adds a striking flavor and contrast to the crunchy exterior. If you like crab cakes, I think you will like these little green patties. This recipes makes four to five large cakes or about eight appetizer-sized ones.

Green Pea Croquettes with Chevre
Serves 3 to 4

1 1/2 cups frozen or fresh green peas
1/2 medium onion, chopped
2 garlic cloves, minced
1 tbsp vegetable oil
2 tbsp part skimmed ricotta cheese
2 tbsp plain goat cheese plus more for serving
1 egg
1/2 tsp paprika
1/2 tsp cayenne pepper
1/2 tsp salt
1/4 cup chopped parsley
2/3 plain bread crumbs

1. Bring frozen peas to a boil in two cups of water for three minutes, drain and set aside.
2. Add one tablespoon vegetable oil to skillet over medium heat. Saute onion and garlic until soft, about three minutes, and add peas. Cook for another two minutes. Remove from heat, cool slightly, then puree in food processor or blender. Set aside.
3. In a large mixing bowl whisk together ricotta, chevre, egg, paprika, cayenne pepper, and salt. Combine well. Add pureed pea and onion mixture, parsley, and half of the breadcrumbs.
4. Set skillet over medium high heat and add about a quarter cup of vegetable oil. While oil heats, form pea mixture into 1 inch thick disks. Coat each side with reserved bread crumbs. Once oil has heated, add two or three patties at a time and cook for three minutes on each side.
Remove to paper towels to absorb excess oil. Serve with a wedge of chevre.

Tuesday, November 18, 2008

Butternut Squash Creme Brulee


Question. What is the first thing you thing about when you hear creme brulee? Is it, fancy dessert? Is it, caloric assault? Cholesterol overload? Impossible to make at home? The thought that goes through my mind when contemplating making  this dessert is whether I should buy a mini flame torch. The reason I never do is I am convinced that once I get it, it will remained packed up at the back of a cupboard somewhere, next to my mini chopper, my crepe pan and my condiment spoons, only to be found if, and when, we move. 

Now, having actually made the dessert for the first time, I have found that possibly the mini torch would have caramelized the sugar more evenly than under the broiler. That being said, the broiler is a good alternative. 

The two main ingredients in creme brulee are heavy cream and egg yolks, typically six to eight yolks for a recipe yielding four servings. Here, I used two yolks and,  in place of heavy cream,  I substituted low fat evaporated milk.  For the rich velvety texture characteristic of this dessert, using butternut squash puree was ideal. It has both body and a creamy texture; exactly what was needed here. You will notice the oven temperature starts out at 400 degrees fahrenheit and is then lowered to 350. This is crucial because the high temperature sets the dessert while the lower one allows it to continue cooking with being grainy. 

Have a happy and healthy thanksgiving!


Butternut Squash Creme Brulee
Serves four

12 oz low fat evaporated milk
1/3 cup sugar 
1/2 tsp freshly ground nutmeg
1/2 cup butternut squash puree*
2 egg yolks
4 tsp sugar

1. Set oven to 325 degrees F. 
2. Dissolve the milk and sugar in a sauce pan over medium heat. Add the freshly grated nutmeg and cook for 10 minutes. Do not bring to a boil. Remove 1/4 cup of mixture and set aside. To the remaining mixture, whisk in the butternut squash puree. Remove from the heat and allow to cool slightly so that when the eggs are added they will not immediately scramble. 
3. Meanwhile, whisk the egg yolks with the reserved milk and return to the pumpkin-milk mixture. Whisk thoroughly. 
4. Pass mixture through a sieve to remove any lumps and divide among four 4"ramekins. Bake in a water bath at 350 degrees for 45 to 50 minutes, until only the middle jiggles slightly when shook. .
5. Once cooked, the custard can be refrigerated between one and 24 hours before caramelizing the sugar crust. To do so, divide the remaining 4 tsp pf sugar evenly among the four ramekins, to completely cover the top of the custard. Caramelize using a blow torch or under the broiler for less than two minutes, monitoring closely to prevent charring. 

*To make butternut squash puree, peel, seed,  and cut a squash into cubes. Add to a large pot with about an inch  or two of water. Cover with lid and steam over medium high heat for 15 to 20 minutes until easily pierced with a knife. Puree in blender or food processor. 

Saturday, October 25, 2008

I'm back with Stuffed Mushrooms


As you may have known, my sister had been visiting last month. Consequently, I have been so busy with her, sightseeing, shopping, helping her study for the SAT's (which is a mute point now since she was accepted to medical school- an international one) etc. So my blogged suffered; I had not been able to post since October 15th. I'm not complaining either because I enjoyed every minute spent with her. It is questionable, however, whether or not she enjoyed every minute with me. (Moody, exacting, and bossy are a few adjectives she would gladly use to describe me.)

She was thrilled with the restaurant scene in Minneapolis; a huge difference from what she was used to. Not only the setting but in terms of the variety. She also enjoyed my home cooking, something she didn't know much of since I left home before she was able to appreciate my recipes. Luckily, she devours everything I make; I little bit of affirmation that I, in turn, enjoy. This recipe was created just for her.

Tofu and mushrooms. Two foods eaten in Trinidad but not widely popular. Consequently, and coupled with the fact that she is sometimes a picky teenage eater, she was not particularly fond of the idea that I would "make" her eat it. ( One of the reasons I doubt she enjoyed every minute with me: there was no " I don't like that" protesting allowed when it came to healthy eating.) In the end, I won he over with fresh portabello mushrooms. "I have never meet a mushroom I didn't like,"she said.

Marina's Stuffed Mushrooms

15 to 20 baby bellas
3 large portabellas
12 oz extra firm tofu
1/3 cup panko bread crumbs
1/4 cup chopped scallions
1/4 tsp salt
1/2 tsp ground pepper
1/3 cup grated cheese
grape seed oil (optional)


1. Remove the tofu from its package and wrap in dry paper towels. Place on a plate and set another plate on top of it. Onto the second plate, set a heavy weight such as a can of beans. Place in the refrigerator for at least an hour. This step is very important because it removes most of the extra liquid from the tofu resulting in a crumblier and less soggy topping.
2.Set the oven to 400 degrees F. With a damp paper towel, gently wipe any dirt off the outer surface of each mushroom. Remove and discard the stems. Set on a well greased baking sheet or baking dish.
3. Remove the tofu from the refrigerator (from its homemade "liquid extractor") and crumble into a bowl, either using your hands or a fork. To this crumbled mass, add the cheese, scallion, bread crumbs, salt and pepper. Mix well.
4. Fill each mushroom cap with the crumbled tofu mixture, and drizzle lightly with grape seed oil, if using. Bake for 15 to 2o minutes until lightly golden brown on top.


Saturday, September 6, 2008

Caramelized Red Pepper and Garlic Flatbread


Today around noon, I thought about going out for dinner. I was thinking about Azia. Once afternoon came around however, the skies turned dark and soon I wasn't in the mood to go any where. I have an irrational fear of the Minnesota weather. My fear is that one day I'll be caught outdoors in the path of a tornado. Coming to think of it, it might not be too irrational. Last year, it almost happened; I was driving, listening to XM, and had no idea that a tornado had touched down not too far away because 1) I was not paying attention to the weather news, and 2) my windows were rolled up so I could not hear the sirens.

It is better to be safe than sorry. That being said, dinner plans were forfeited for my homemade flat bread. And hot chocolate.


2 tsp active dry yeast
1/2 cup warm water
1 tbsp honey
1 egg
1/2 cup whole wheat flour
3/4 cup all purpose flour
2 red bell peppers
2 tbsp spicy brown mustard
2 garlic cloves, minced finely (very finely)
1/2 cup grate cheese (or more if you desire)

1. In a large mixing bowl, mix together yeast and warm water. Set aside until foamy, about 10 to 15 minutes.
2. Add egg, honey and flours to yeast and knead into a soft dough. Move dough to a floured surface and continue kneading for three to five more minutes. Return to the mixing bowl, cover with a tea towel and allow to rise for 30 to 45 minutes.
3. Meanwhile, in a skillet set over medium heat, add two tablespoons of vegetable oil. Add thinly slices bell peppers to the pot, season with sea salt and cook for 15 to 20 minutes, stirring occasionally to prevent burning.
4. Once the dough has risen, set oven to 350 degrees F. Roll into a disc or rectangle to fit your baking sheet (which has been sprayed with cooking spray.) Brush mustard onto the entire surface of dough and sprinkle minced garlic throughout. Top with cooked bell pepper, followed by cheese. Bake for 15 minutes. Consume immediately.

Wednesday, September 3, 2008

A Trip Down Miso Memory Lane


When I first met my fiance, I was still in college. He was so attentive, a trait he portrayed mainly by bringing me food every weekend. We joke that in the beginning he cooked for me regularly, he's actually quite a creative cook. (I should post one of his recipes here one day) Now, I cannot even recall the last time he turned on the stove. In his defense, he has offered a great compromise: his new way of cooking is taking me out to dinner every night during the weeks that he doesn't work, which is quite often and which I gladly accepted.

What kinds of food did he bring me during those first months of our relationship? Grilled salmon, stuffed portobellas, to name a few but the one that stands out the most was miso soup. At that time, he didn't know that I was not particularly fond of miso, and not wanting to seem ungrateful, I graciously accepted and it eventually it grew on me. Surprise, surprise.

It pays to be open-minded because, the truth is, I have found that despite its strong, distinct flavor, miso is quite versatile and I have learnt to incorporate it in my cooking. Over the past four years, we have eaten many a miso dish. From miso noodles, to miso duck, to miso cod. Which brings me to m newest miso creation: miso glazed scallops. Enjoy!


Miso Glazed Scallops
Serves 3 to 4

6 to 8 bay scallops
1/2 cup miso paste
1/4 cup white wine
2 tbsp brown sugar
1 tsp freshly grated ginger
2 tbsp canola oil
2 onions, sliced thinly
fresh scallions to garnish

1. Combine miso paste, white wine, brown sugar and grated ginger. Add scallops and marinate overnight in refrigerator or for at least four hours.
2. Remove scallops from marinade and broil under broiler for 3 minutes on either side. 
3. Meanwhile, transfer marinade to a sauce pan and cook over medium high heat, until reduced by half, about 3 to 5 minutes.
4. For caramelized onions, heat 2 tablespoons of vegetable oil over medium heat, add onions and cook for 15 to 20 minutes, stirring frequently until soft, fragrant and brown.
4. Spoon reduction over roasted scallops and serve with a mix of fresh scallions and caramelized onions.

Monday, August 25, 2008

Mixed Fruit Pie with Peanut Pate Brisee


You know the song that's stuck in your head that you can't get rid off? You sing it in the shower, waiting in line at the grocery, whenever you have a quite moment it is the first thought that pops into your head. To make matters worse, it is not even a song you like. Most likely an annoying commercial jingle.

Well, this describes my relationship with peanuts, in a nut shell (pun intended.) I like other nuts: cashews, pecans, hazelnuts, but not peanuts. Yet, I do eat them time and again. My own mystery of the ages. Recently, I even had an unsual obsession with peanut butter and had been working on a recipe for peanut pate brisee. 

Peanuts are quite popular in East Asian cooking which is a frequent part of my dining routine, and honey roasted peanuts are a standard street snack in the Caribbean. Thus, my present and past are spotted with peanut (or dare I say "nutty") experiences. Could it be that I find a sense of familiarity or that I want a reminder of those times? Maybe. Either way, mine is an odd relationship with America's most popular legume.

That's right, peanuts are actually legumes much like peas and beans. They grow under the ground unlike true nuts which grow on trees. Just like their legume cousins, peanuts are rich in protein and, like true tree nuts, they are rich in good unsaturated fats. Of course, too much of a good thing can sometimes be a bad idea. A diet with too much unsaturated (although they are called the "good" fats) can be harmful. Remember, excess fat can contribute to and/or complicate many health problems.

 
Mixed Fruit Pie with Peanut Pate Brisee

1 peach
1 apple
2 cups blueberries
1/2 cup brown sugar
juice of 1 lime
1 tbsp cinnamon
1/4 tsp ground ginger
1/8 tsp ground nutmeg
pinch ground cloves
1 tbsp of all purpose flour
1/4 tsp corn starch
peanut pate brisee (see recipe below)

1. Set oven to 400 degrees F. 
2. Dice the peach and apple. Add to a large bowl, together with blueberries, sugar, lime juice, spices, 1 tablespoon all purpose flour and cornstarch. Mix well and refrigerate until ready to use.
3. On a well floured surface. roll one piece of pate brisee into a 10 " disc. Gently place into a well greased pie dish, cutting off any excess dough. Bake blind at 400 degrees F for 15 minutes. Remove from oven.
4. Meanwhile, roll the second half of the pate brisee into 9 to 10 " round disk. Refrigerate until ready to use.
5. Fill bottom pie shell with fruit mixture. Cover with top pie crust, either as a whole or in strips to form a crisscross pattern.
6. Bake at 400 degrees F for 15 minutes. Lower the heat to 350 degrees and bake for an additional 45 to 50 minutes. If the crust darkens too quickly, then cover with aluminum foil. Remove from oven and allow to cool for at least 20 minutes before serving.


Peanut Pate Brisee
1 cup peanuts, toasted
1/2 cup all purpose flour
1/2 cup whole wheat flour
1/4 cup brown sugar
3 tbsp cold unsalted butter
1/4 cup plus 2 tbsp cold water

1. In a food processor, grind peanuts to a powdery consistency. 
2. Add peanuts, whole wheat flour, all purpose flour, sugar and salt to a large mixing bowl. Combine well.
3. Mix in butter until the flour mixture looks like sea sand. Add 1/4 cup of cold water and combine until it all comes together into a ball, adding the extra 2 tablespoons of water as needed. Continue to work into a smooth ball. 
4. Cut pate brisee into two pieces, wrap each piece in plastic wrap and refrigerate until ready to use.


Saturday, August 16, 2008

Roasted Cornish Hens for Two


Last year, a couple weeks before Thanksgiving, we were at the airport getting ready to board a plane for a quick trip to New York. At the newsstand, I picked up a cooking magazine with instructions on planning a flawless Thanksgiving dinner. Since that upcoming Thanksgiving would be my first time hosting dinner at our new apartment, the first time I would make dinner for Thanksgiving period, I thought, why not give it a try. After all, I really wanted to host an unforgettable dinner so I could use all the advice I can get. The day came and went and my mission was accomplished and I was left with the best technique for roasting the perfect turkey. The key is brining. The result is the most succulent meat.

I decided to employ this method with cornish hens; it is a smart way of roasting poultry to get added flavor and to prevent the meat from drying out without having to add a ton of butter. You are probably thinking this is a lot of work for such a small bird. Yes it is but the results are worth it. And with a little planning, this should not be a tedious endeavor.

Roasted Cornish Hens for Two

For the Brine:
10 - 12 cups water
3/4 cup sea salt
3/4 cup honey
1 large bay leaf
2 cloves garlic, minced
1 tbsp whole black peppercorns

Seasonings:
1 tbsp dried thyme
salt and pepper
2 small bunches fresh cilantro

2 whole cornish hens (1 to 1 1/2 lbs each)

1. Bring the brine ingredients to a boil. Allow to cool to room temperature. Place hens in brine, cover and refrigerate overnight or for at least eight hours. Remove the birds from the brine and rinse with cold water. Pat dry with paper towels.
2. Set oven to 400 degrees F. Place hens in a roasting pan and season liberally with dried thyme, salt and pepper, remembering to also season the cavity. Stuff the cavity of each bird with a handful of fresh cilantro. Roast in oven for 1 hour, rotating 180 degrees halfway through. If you find that the birds are getting too dark too quickly, cover with foil and continue to roast. Remove from the oven, and let rest, covered in foil, for 10 minutes before serving.

Thursday, August 14, 2008

A Late Summer Fruit and Ruby Tartlets


It is difficult to imagine anything but snow and sleet in Minnesota, but we do get gorgeous spring and summer days. It even gets all the way up to the nineties. This year for the first time, I spent the entire summer months here. No traveling, just enjoying the local scene. I must say, I was quite surprised. Summers here are filled with activity or so it seems. I get the feeling some times people prefer to simply be outside without having an agenda. Quite a difference from the winter months when there really seems like NO ONE is outdoors.  

I  have spent many summer vacations on the east coast; bordering on unbearable. The humidity can be almost suffocating. The same can be said for the hottest days in the Caribbean. So, when I hear Minnesotans talk about the humidity, I just shake my head and think they  have no idea how great this is.  More than just the climate. The greenery, sports, attractions, and not to forget the  food. The restaurant scene takes on a life of its own from May to August. Outdoor dining, grilled summer vegetables, Minnesotan wines, and  the icing on the cake, easy parking. Although Minneapolis is the  second largest city in the midwest, after Chicago, we feel almost privileged  because of the joyful ease with which restaurant parking can be here. It is as though you own the city: decide to eat out, get dressed, get in car, pull up to restaurant, and, right there, is parking. Usually. 


Although it might be sort (the nights are now a little cooler, an indication that summer days are numbered,) summer 2008 in Minneapolis is fabulous. Weekly canoe trips, outdoor dining, lake walks, summer fruit. Oh sweet, delicious, colorful, summer fruit. Raspberries, watermelon, blueberries, but alas, all good things come to an end. Luckily, when one door closes another opens, or more,  appropriately,  when one fruit harvest ends another begins. 

Enter the pluot.  A late summer fruit, (harvested at the end of July and available into August) this hydrid plum-apricot has a sweet, delicate flavor reminiscent more of a plum than an apricot. Of the different varieties available, my personal favorite is the  Dapple Dandy. Blotchy on the outside with a bright, ruby red interior (hence the name of this recipe), it peels readily which makes it easy to use. Even though summer is coming to an end, there is not reason not to explore the juicy bounty of tail end. And what better way that a little piece of tartlet heaven?


Ruby Tartlets 
Makes 8

1 cup pecans
1/2 cup graham cracker crumbs
1 egg
2 tbsp canola oil
1/4 cup brown sugar
1 can low fat evaporated milk
1/4 cup honey
1 tbsp plus 1 tsp corn starch
3 tbsp fat free cream cheese
2 large pluots, peeled and sliced thinly


1. Set oven to 375 degrees F. Spray muffins tins and set aside.
2. In food processor, grind pecans until almost the same texture as the graham cracker crumbs.
3. In a large mixing bowl, combine ground pecans, graham cracker crumbs, egg, oil and sugar until it all comes together.
4. Divide pecans mixture in each muffin cup, two and a half tablespoons in each. Using your fingers or the back of a spoon, spread out the mixture so that it comes up the sides of each cup. Bake for 20 minutes. Immediately remove from muffin tin and cool on a wire rack. Reduce oven to 350 degrees F.
4. In a heavy sauce pan over medium high heat, whisk together evaporated milk, honey, cream cheese and corn starch. Cook custard for 20 to 25 minutes, whisking occasionally, until thickened.
5. Place tart shells onto a well greased cookie sheet. Spoon enough custard into each shell, being careful not to spill down the sides. Arrange three or four pluot slices on top of custard and bake for 20 to 25 minutes until custard sets further. Remove from the oven and cool completely on a wire rack.

Sunday, June 22, 2008

Garlic and Lime Shrimp with Riesling Sauce

Shrimp is possibly the most effortless seafood to prepare. It cooks quickly and pairs wells with many herbs and seasonings. This recipe is quite simple but requires at least two hours in the refrigerator for the seasonings to meld; best if left over night. Fill them into endive spears and you'll have an enticing appetizer or side dish. Alternatively, serve over savory polenta for a satisfying entree. Whichever way you choose to serve this dish, you will come back to it time and again, whenever you need a simple but gourmet idea for shrimp.


2 lbs raw shrimp, shelled and deveined
5 gloves garlic, minced finely
1 cup fresh cilantro, chopped
1 tsp salt
1/2 tsp ground pepper
2 large limes
1/4 cup dark maple syrup
1/3 cup Riesling
1/4 tsp corn starch
endive spears for serving, optional


1. Add garlic, salt, pepper and cilantro to shrimp.
2. Squeeze limes and add juice to seasoned shrimp. Limes should yield about one third of a cup.
3. Cover bowl will plastic wrap and refrigerate for at least at least two hours, preferably over night.
4. Heat a large skillet over medium high heat. Add two to three tablespoons of olive oil.
5. Using a pair of tongs, remove the shrimp from its marinade. Reserve leftover marinade to prepare sauce.
6. Cook shrimp for 3 to 4 minutes until pink and cooked through. Remove from skillet and transfer to a heat proof bowl; cover tightly with aluminum foil.
7. Pour reserved marinade in skillet and add wine. Cook over medium heat until reduced by half, about 15 to 20 minutes.
8. Strain wine reduction and return to pot. Add corn starch and cook for an additional two to three minutes until slightly thickened.
9. Serve shrimp in endive spears and drizzle with Riesling sauce.